There is no doubt about the fact that mobile Snapchat spy apps have become extremely popular at present. Here, we have mentioned some authentic reasons for that.
These apps will enable you to track outgoing and incoming phone calls, locations, as well as SMS.
The good thing is that these apps are concealed and undetectable to the person who is being monitored.
The Snapchat spy app likewise helps to track browser activities, GPS locations, as well as messages from applications such as Facebook, WhatsApp, and Snapchat.
How legal is the use of tracking your child
Children are inquisitive about most of the things in life.
However, when it comes to the world of the Internet, parents must impose some restrictions.
The web has some content that might be detrimental for the child in the long run.
It is a fact that kids often become offended when their parents try to monitor their online activities.
Nevertheless, parents have the legitimate right of controlling the usage of smartphones and tablets by their kids.
There is a certain age limit of becoming an adult in every state, and parents will be able to control the Internet usage of their children till that age.
Functionality Snoopza Snapchat spy tool for Android
Snoopza spy app – a fantastic solution for Android and other gadgets to spy on Snapchat.
Below, we have stated the main functionalities of this amazing tool.
Track and record call – It will be possible to track all outgoing, incoming, as well as missed calls from the target gadget and these can also be recorded.
Capture screenshots – The screenshots of the target device can be captured as well as recorded for showing what the target is up to within a few seconds only.
This feature will be essential in case any evidence is required regarding something that is going on.
Invisibility – The app is going to remain invisible to the target user, although it is imperative to install the app in the gadget.
It will be able to work on Snapchat, WhatsApp, Facebook messenger, and so on.
Location tracking – It will be possible for you to comprehend where the target is in real-time.
However, the target person must be carrying the phone along with him and it also requires Wi-Fi, GPS, and signal towers to accomplish the job of tracking the person.
Contact information – The tracker will allow you to know with whom the target person is interacting on the web even though it might be in stealth mode.
Installation
It is very simple to install a Snapchat spy app like Snoopza on any Android gadget in several simple steps within a few minutes only. The procedure is as follows:
• First of all, you need to register at the app’s official site Snoopza.com and open a free online account by providing your valid email account as well as password.
• Following this, the app can be installed on the target mobile gadget within several seconds by making use of the free account created by you in the previous step.
• Now, you need to log in to your online account and start monitoring the smartphone of your toddler without any problem at all. It will be feasible for you to track phone calls, SMS messages, the location of the mobile gadget, screenshots, the history of the Internet usage, and so on.
Stealth
The effectiveness of using the Snoopza Snapchat spy app depends on the fact that it will be possible for you to hide such that the target user will not be able to comprehend that he is being tracked.
This Snapchat spy app comes with an innovative stealth mode feature that enables it to remain undetected.
This will make certain that the user will not be limited when it comes to tracking the target person since he will not know that he is being spied.
Besides this, the app will also not be installed and won’t show up in the application list.
Free Functionality
The most notable free features of Snoopza are as follows:
Keep a track of SMS, outgoing and incoming messages, as well as other messages.
Monitoring and tracking of social networking sites.
Controlling the mobile device remotely.
The capability of capturing complete details of Internet usage as well as browser activities.
Paid functions
Some of the most significant paid functions of the Snoopza Snapchat spy app tool are as follows:
It will aid in tracking outgoing and incoming calls.
It comes with a cutting-edge GPRS tracking facility that will be able to monitor the movements of people.
It will enable you to understand the audio calls and video calls which are being made from the mobile gadget.
The free features mentioned in the previous section are likewise available.
Pros & Cons Snoopza is a free spy app Snoopza
The pros:
• Will be able to track any child or adult 24 hours a day.
• Provides you with all the details of the individual who is being tracked.
• Helps to block access to several websites particularly if the activities of your kid are being monitored.
• Helps your kid to study effectively by minimizing his or her phone usage time.
The cons:
• Your child might be offended by your behavior.
• Some individuals might think that you are hampering their privacy.
• Kids who are being tracked might become silent and withdrawn.
Pricing Policy
A Snapchat spy tool like Snoopza comes with a comprehensive pricing structure. In the free Basic plan, you will be able to use the software without paying anything at all.
Plan
Basic Plan
Standard
1 month
Free
$14.95
1 year
Free
$99.95
On the other hand, the Standard Plan demands you to shell out $9.95 every month or $99.95 every year.
This plan will allow you to access all the free features along with the premium features such as track camera, Facebook spy, etc.
Conclusions and results
Snoopza is one of the most in-demand Snapchat spy apps on the market which has received lots of positive reviews from the users.
It is noted for playing a significant role in terms of parental control.
However, this Snapchat spy app should not be used for blackmailing other individuals or any other similar malicious activities that might hamper their safety in the long run.
LG has launched its “W41” series that carries three phones — the LG W41, LG W41+, and LG W41 Pro — in India. The smartphones have similar specifications including quad rear cameras, hole-punch display design, and a 5,000mAh battery. All these new LG phones also have a dedicated Google Assistant button. However, the LG W41, LG W41+, and LG W41 Pro come in distinct RAM and storage options. The LG W41 series features up to 128GB of onboard storage and is available in two distinct color options. Check out the complete specifications details and pricing details of the newly-launched LG smartphones in India.
LG W41 Series Specifications, Features
Image courtesy: Digit.in
As aforesaid, the new LG W41 series brings three smartphones having similar specifications. All three phones, ie. LG W41, LG W41+, and LG W41 Pro feature a 6.5-inch HD+ HID Full Vision display with a 20:9 aspect ratio. Under the hood, they run Android 10 with Q OS on top and feature an octa-core MediaTek Helio G35 SoC. The phones pack a 5,000mAh battery and have a rear-mounted fingerprint sensor for biometric unlocking of the handset.
While the specs remain similar, the difference lies in storage options. The LG W41 handset comes in a sole 4GB RAM + 64GB of onboard storage option. The other two, the LG W41+ and LG W41 Pro, come with 4GB RAM + 128GB storage and 6GB RAM + 128GB storage configurations, respectively. Further, all models have the same dimensions, ie. 166.5×77.3×9.3mm, and the same weight of 201 grams. The phones have a USB Type-C port for charging and data connectivity.
In terms of optics, the latest LG W41 series comes with a quad rear camera setup with a 48MP primary sensor. The other three cameras include an 8MP secondary sensor with an ultra-wide-angle lens, a 2MP depth sensor, and a 5MP macro shooter. At the front, there is an 8MP snapper for taking selfies and video calling.
Pricing and Availability
The pricing of the new LG W41 series starts from INR 13,490 for the sole LG W41 phone with 4GB RAM and 64GB onboard storage. The LG W41+ price in India is set at INR 14,490 for the 4GB RAM and 128GB internal storage option. For the last device, ie., the LG W41 Pro with 6B RAM and 128GB onboard storage carries a price tag of INR 15,490. In terms of availability, these phones come in two color options — Laser Blue and Magic Blue. They’ll go on sale on all leading online stores in India.
Suppose you notice something interesting on your laptop, desktop, or smartphone, and you want to share it immediately with your peers taking a screenshot is the most efficient way to share this exciting information in the least time. Screenshots are helpful in other ways, such as sending error messages containing technical information to support teams, snipping an ecstatic moment during your gameplay, taking shots of images that you cannot save, and so much more. Windows, Mac, and Android operating systems provide an easy solution for taking a screenshot, but this is not the case for a Chromebook. So today, we are going to show you how to take a screenshot on a Chromebook.
Chromebook by Google came into the race with Windows and Mac-based laptops in 2011, featuring ChromeOS (based on Linux). Manufacturers such as Asus, Lenovo, HP, Samsung make Chromebooks and make them widely available. These computers highlight portability, robustness, and boast fluidity. But working with ChromeOS is hectic, especially for beginners coming from a non-technical background. Therefore we provide you with a comprehensive and engaging guide on how to take a screenshot on a Chromebook. Later on, we also include some extra things we can do with these screenshots.
Ways to Take a Screenshot on a Chromebook
Grabbing a screenshot on Chromebook is slightly tedious than doing the same Windows or Mac laptop. But through this article, you can learn to take a full screenshot, a partial screenshot, taking a screenshot with a stylus, and using Chrome browser extensions.
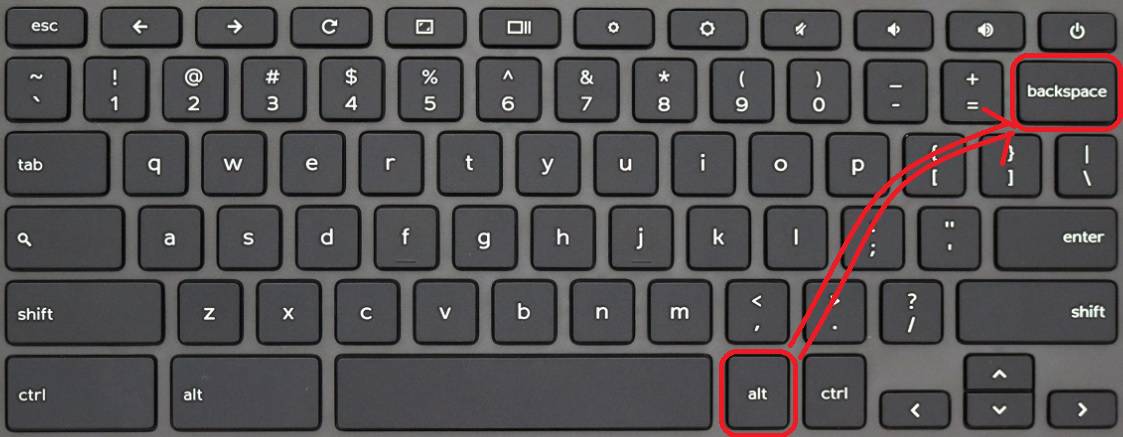
Important: The keyboard layout of all Chromebook models is the same, so be assured that the images given will be the same as your Chromebook.
1. Taking a full screenshot with shortcut buttons
This method is the easiest way to take a screenshot. We can save the entire screen’s image with a simple combination of keyboard buttons. The screenshot gets saved in the Downloads folder. So let’s see how to do it:
Move to the screen with the exciting content. Press the Ctrl button, and while pressing it, push the []]] (Show Windows) button.
The screen will dim for a second and then light up, suggesting that the screenshot has been taken, indicated by notification on the bottom-right corner of the window.
2. Taking a partial screenshot with shortcut buttons
Taking a partial screenshot is essential when we want to extract the required portion of the screen rather than the whole, thereby making this feature a powerful editor. We can use this to create an image from non-downloadable material, focus on a particular portion of the information, and so on. Here are the steps for it:
To take a screenshot of a specific section of the screen, press Ctrl, then Shift, and while holding both of them down, push the []]] (Show Windows) button.
The screen will dim, showing a cross-shaped cursor, using which you can draw a rectangular area over the critical part of the screen.
After finalizing the box and releasing the finger from the touchpad, the small screen rectangular area is saved directly to the Downloads folder.
3. Taking a screenshot with a stylus
If you own a Pixelbook, Pixelbook plus, Samsung Chromebook Plus, or any other stylus-based Chromebook, there is already an option present separately for the stylus.
Using your stylus, tap on the pen-shaped icon on the screen’s bottom-right corner to the left of the notification area, which will open up a popup menu.
From the popup menu, you can tap either “Capture region”( which will provide the option of taking a partial screenshot) or “Capture screen”(helps us taking a full screenshot). And as always, the screenshot is saved in the Downloads section.
4. Taking a screenshot with Chrome extensions
Chrome extensions are beneficial for taking screenshots when we take screenshots regularly, and we need to find a simplified solution for sharing and storing such pictures. We can find various free screenshot tool in the Chrome Web Store, but we include here our three favorite extensions along with their specialties:
Nimbus Screenshot & Screen Video Recorder – Its facilities include taking full and partial screenshots, editing tools, trim/crop tools, record video from screen and webcam.
FireShot — Whole and partial screenshots, editing tools, send screenshots directly to Gmail.
Scrn.li — Whole and partial screenshots, editing/annotation tools.
In order to use these extensions, go to the link provided and tap on Add to Chrome. After the download finishes, it will install automatically, and finally, you will be able to use the services offered by clicking on the icon of the extension.
Things you can do with Screenshots
Once we have taken a screenshot, many questions can arise in your mind. Where are these screenshots stored? How can we access them? Is there a way to modify/delete them? So in this article, we are also going to explore the answer to these questions.
1. Opening a screenshot
The Downloads folder contains all the screenshots grabbed using shortcut keys. This folder resides in the offline local storage of a Chromebook. Let us see how this works.
Firstly, click on the Files icon from the app dock at the bottom. This action will open a window showing the local storage of the device.
Double-click on the Downloads folder under the My Files subsection. The screenshots are listed here in PNG format(Portable Network Graphics). Their names contain the date and time corresponding to the moment a user captures them.
You can open these screenshots by double-clicking on them.
2. Editing a screenshot
After taking a screenshot, you may get the urge to draw something on it or remove a portion of it. In other words, you may need to edit the screenshot. For doing that, follow the steps below:
Double click on the picture which you want to edit. The photo opens on a default photo editor. Click on the icon shown below.
The editor will provide you with options like cropping, changing the brightness, temperature, color saturation, rotating the image, reversing the changes done, etc. The choices are shown accordingly here.
After applying these changes, click on save to save the image with the modified changes. It is essential to know that the original image will be deleted if you save it.
3. Deleting a screenshot
If you have taken single or multiple screenshots by mistake, you can delete them easily.
Select the screenshot with a single click on it. Press ALT on the keyboard, and while holding it, press Backspace.
After pressing the key combination the file is deleted with ease.
Conclusion
Capturing screenshots is helpful in our day-to-day lives. It makes sharing information a piece of cake. We hope that our comprehensive article helps you to navigate through the tricky ways to capture and handle a screenshot on your Chromebook. Feel free to share this article and comment below to clear your doubts.
After the YouTube app on iOS, now YouTube for Android has gained support for 4K HDR playback. The new YouTube app will now allow Android users to watch videos in 4K HDR for the supported videos. Just to tell you that until now, people using YouTube Android app could only watch videos at a maximum 1440p resolution. The latest update now brings the support for watching YouTube videos in 4K HDR on Android even if you don’t have a 4K display.
With the latest update bringing 4K HDR support for the YouTube app on Android, users will now see an additional option in video quality — 2160p (4K) HDR. Earlier, users could only see resolution options for up to 1440p at the maximum, even if their display supported higher resolutions and the video was 4K. But now it’s changed, and you can watch YouTube videos on Android in 4K HDR. The feature has already started rolling out for some devices, all you need to do is just update your YouTube app to the latest version.
How to Watch YouTube Videos in 4K HDR on Android
The new update that brings 4K HDR streaming support to the YouTube Android app is rolling out, says Android Police. To check if you’ve got the 4K HDR playback support on your YouTube app and watch videos in 4K, follow these steps.
1. Open the YouTube app on your Android phone and go to any video that’s uploaded in 4K.
2. Now click on the three-dot menu icon at the top-right corner of the player.
3. Next, tap on “Quality,” and you should be able to see 2160p60 HDR among other resolution options.
4. You’ll see 144p60 as the lowest option followed by 240p, and going up to 2160p60 HDR.
If you don’t see the 2160p60 (4K) HDR option, then check to make sure you have the latest version.
YouTube had been bringing a slew of updates to enhance the user experience of both creators and viewers. Recently, the company has announced that it’ll roll out the YouTube Shorts feature in the US starting March. This feature debuted in India back in September 2020.
In this article, we will demonstrate how to debloat or remove system apps from Samsung Galaxy S20. The guidelines are designed to do the task in less than 10 minutes and they are hassle-free and easy to understand following a step-by-step methodology.
Why do we need to remove system apps
Samsung includes much bloatware (apps that are not useful) in their device. Primarily, these apps consume a lot of internal storage space and result in the quick depletion of the battery. About 80% of these apps are not updated regularly and can slow down the smartphone or expose the device to harmful malware and pesky advertisement that can pop up anytime while working on the phone.
If you are bothered by such apps in your Samsung Galaxy S20, then you have come to the right place. So without much ado, let’s see how to do it.
Necessary: These steps do not require rooting your Android device or unlocking the bootloader. But since you aredeleting the system apps, You need to back up the data stored in the system apps.
Things you need beforehand
A laptop/desktop with Windows 7/8/8.1/10 with .NET Framework 4.6 or above installed (needed for ADB AppControl).
Samsung Galaxy S20 (obviously)
A working USB cable to connect mobile with laptop/desktop
Internet Connection
Downloadable Files
Here are the links of the files required to download for this guide. Download should be done in laptop/desktop inside a single folder for easier access. If you download zip files, extract them to the same folder.
Debloat Samsung Galaxy S20 using ADB AppControl – Steps to follow
1. Enabling Developer Options on Galaxy S20
Firstly, Developer Options are a hidden set of features that enthusiasts can use to tweak their Android Device. We will be using it to discover an option known as “USB Debugging” in the next step.
Firstly, go to Settings, scroll to the bottom, then tap on About phone.
Scroll down and tap on Software Information to reveal various system software details.
Tap on Build Number 7 times. Enter PIN/password when prompted.
You will receive a toast notification saying, “Developer mode has been enabled.”
2. Enable USB Debugging on Galaxy S20
USB debugging is a developer tool that enables an external device to access the smartphone debugging settings via the USB port. The debugging is mostly handled by ADB (Android Debug Bridge), which bridges the Windows OS with Android. We will use this feature to remove system apps through the ADB AppControl app.
Go to Settings, then scroll fully down.
Tap on Developer Options
Toggle the USB Debugging option to ON
When prompted to allow USB debugging, select OK.
3.Installing ADB in Windows 7/8/8.1/10
Now we will install ADB on our Windows laptop/PC. This process will install the required drivers that work to communicate and send commands to the android device through USB.
Firstly, navigate to the folder where you have unzipped ADB_DriverInstaller.zip given in the Downloads section.
Right-click on DriverInstaller.exe, then click on “Run as administrator,” then click YES on the following prompt.
On the small window that pops up, click on INSTALL DRIVER.
On the window with title Windows Security, click on Install
Click on OK after a successful install of ADB Driver.
4. Using ADB AppControl to debloat Galaxy S20
Finally, we reach the last step required to remove system software from the Samsung Device. The purpose of the app is to provide the list of software installed in the Android device, get a preset containing the name of packages that make up most of the bloatware, run ADB commands on its terminal to provide the necessary changes in the device.
Other functions of the app are ACBride, Network Debugging, running custom ADB commands, and the choice to disable, enable, save restore and install apps remotely from the computer, changing permissions. But we will not need those since we already have the preset file which contains the name of the system apps. So, let’s get going.
Go to the folder where ADB_AppControl.zip from the “Downloads” section has been extracted
Double click on ADBAppControl.exe
After the loading screen, the application opens with a Quick Start tutorial. Click on I Got it! to close the popup
The window will then show Disconnected status and is waiting for you to connect the Samsung Galaxy S20 with a USB cable. So Connect the Device. After connection, the smartphone will ask permission for USB Debugging. Check on Always allow from this computer, then tap Accept.
IMPORTANT. Do not lock the phone after connection. Keep it awake
After proper connection and acceptance, the ADBAppControl application will show the status as connected, and it will show the device name with the model number. A prompt will show to Install ACBridge. Click on Yes.
Upon completion of the installation, you will see all the apps installed in your Samsung device along with the icons. Click on Load Preset to bring the preset text file into the application.
Select the file Samsung_Debloat_Preset_Demo.txt by navigating to the folder where you have downloaded the file. Then it will display the number of apps selected from the complete list based on the app names in the preset file. Click on OK to accept.
From the drop-down menu, select what do we want to do with these apps. Since we want to remove them altogether, choose Uninstall. Then click on Uninstall.
An Attention warning pops up, which tells us that deleting system apps can result in a system’s malfunction, which is just a warning. Removing the system apps selected in the preset will not hamper the normal functioning of the device. Click on Yes to continue.
A Backup prompt is shown, which consequently asks you if you want to backup the apk of the system apps. Again, it is always better to remain safe, so click on Yes.
After completing the process, it will show a confirmation dialogue that it has removed the selected apps. In my case, I had chosen just one app, so it shows 1/1, indicating 1 out of 1 selected app has been removed. However, if it fails, it would have shown Removed Applications 0/1. Click on OK to confirm.
Conclusion
So, there you go! You now have removed system apps or bloatware on your Samsung Galaxy S20. To sum up, this short but efficient process should immediately de-clutter your device and provide you with a smooth sailing experience from here on. Enjoy longer battery life and almost zero lagging with no fear of any security vulnerabilities. I hope you enjoy reading the article, and don’t forget to leave a review below. Also, if you have any questions, feel free to let me know.
Microsoft has officially announced a new $100 Xbox Wireless Headset that it’ll launch next month. It is the company’s first wireless Xbox headset for a long time — precisely, since Xbox 360 days. As per the latest announcement, the new headset can connect with multiple devices including Xbox One, Xbox Series X|S, and Windows 10 PCs. Further, it also connects with mobile devices via Bluetooth technology for on-the-go music or chat.
Image courtesy: Xbox Wire
The Xbox Wireless Headset can simultaneously connect with both the console and a mobile device so that you can accept calls while continuing your game. For design, the new headset matches the design of Xbox Series X / S. With an adjustable cushioned headband, it carries a lightweight frame with large leather ear cups. Another highlight of this new headset is that it also supports all major spacial sound technologies. These include Dolby Atmos, Windows Sonic, and DTS Headphone:X.
Xbox Wireless Headset Features
The Xbox Wireless Headset has dual beamforming microphones and voice isolation that help it reduce background noise. You can also tuck away the microphone when not in use. Further, you can adjust the volume of game audio and team chat separately by rotating the earcups. The headphone will weigh 312g and will take around three hours for a full charge.
Image courtesy: Xbox Wire
Speaking of battery, the Xbox Wireless Headset will last up to 15 hours on a single charge. If you don’t get to charge the headset for three hours, which is the time it takes for a full charge, then you can charge it for a mere 30 minutes over USB-C and you’ll get to use it for around four hours. Furthermore, the tech giant is updating the Xbox Accessories app to add equalizer controls, bass boost, mic monitoring, auto-mute sensitivity, and brightness of the microphone’s mute light.
As aforementioned, the new Xbox Wireless Headset will launch next month, but Microsoft has already started taking pre-orders from today. The Xbox accessory will be available worldwide starting March 16 at $99.99. If you want to be among others to grab it first, pre-order the headset at the Microsoft Store and other retailers today.
From being a sophisticated and unavailable piece of technology to being a readily available gadget, 3D printers have a unique journey. Stratasys, the global leader in 3D printing, came up with the world’s first 3D printer back in 1990. They were the first to print tangible objects from a printer, which did not look less than a science fiction work.
Fast forward to 2021; we have a whole market of commercially available, economical 3D printers. There are so many options that if someone starts looking through them, they would probably be confused. As tech advances, it becomes affordable, and so is the case with 3D printers. Today, there are over hundreds of printers out there.
It does not matter whether your budget is as low as $500; you could still buy a 3D printer. But we do not want you to waste time or money; as such things are usually a long-term investment. We would strongly advise you to put your bucks on one of the devices in this listing as they are the best under $1000. Selecting 10 devices from a product page of thousands on devices is not easy. To sabe your time, we have come with the list of best 3D printers in a budget.
It is not easy to invest a thousand bucks very frequently. And if you are planning to do so, you would also like to utilize them to your benefit. The good news is that features such as heated beds, touch screens, and filament detection are available on 3D printers for under $1000. These are durable, heavy-duty printers here.
Having a 3D printer is not only suitable for a commercial purpose. It helps in various day to day activities that you would not have imagined—for example, a plastic bottle, toys, switches, handles, and whatnot. You can design and print your mobile case, action figures, gifts, etc.
The list contains 3D printers for every need. Whether you need one for your kid, for yourself, or business, we got you covered.
What should you consider before buying a 3D printer
1. Type of printer
There are mainly four types of 3D printers. Stereolithography (SLA) uses photopolymer in liquid form and converts it into a solid object using laser beams. Fused Deposition Modeling (FDM) also works on the same principle but used thermal plastic. On being exposed to laser beams, both the materials harden.
Selective Laser Sintering (SLS) and Selective Laser Melting (SLM) sinters and melts the metal powder, respectively. Both use a laser to increase the temperature of metal powder and give them the desired shape.
The type of 3D printer you need depends upon what you want to use them for. If you’re going to buy a good 3D printer for a hobby or casually molding stuff out of plastic, the FDMs or the SLAs will do well for you. Going with the SLS and SLM will be best for you if you want to do heavy-duty metallic printing.
2. Resolution of the printer
If you need your designs and objects to be detailed (e.g., Jewelry, accessories), a 3D printer with a low resolution would help you. The lower the resolution, the higher is the amount of detail that it can produce. Some high-quality printers can print as fine as 50 or 70 microns.
3. Supported Materials
The most common materials used are thermoplastics such as Poly Lactic Acid and Acrylonitrile Butadiene Styrene. The materials come as spools of fiber that has to be connected to the printer supply. Printing materials are like ink for your 3D printer.
4. Safety
While using a 3D printer, you should use safety gloves. The objects that you print are essentially molten, re-shaped plastic, which is very hot at first. The printer bed and extruders can also become hot. Do not touch the printer while it’s working. Generally, the printers with a closed structure are safer than those that operate in open printing space.
5. Printer Bed
As the name suggests, this part acts as a support bed for your design. As the printer creates an object over time, it rests on the printer bed. Depending upon the type of printer and material being used, you can get either a heated bed or a non-heated bed. A low-quality bed might harm your design or object, as the hot plastic sticks to them.
In this list, we will be exploring 3D printers in ascending order of prices. Now you know everything about them, how they work, and what you should be looking for, let start with the 10 best 3D printers under $1000.
List of Affordable 3D Printers Under $1000
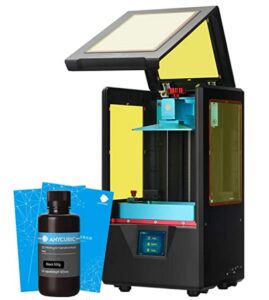
1. Anycubic Photon S
Image Courtesy: Amazon.com
This 3D resin printer is solely for beginners. It is a simple plug and print machine that helps you turn your imagination into tangible designs. If you are planning to learn 3D printing or are a teacher at a school and need kids to learn about 3D printing, this one is tailor-made for you.
Even though it is an entry-level 3D printer, the Anycubic Photos S comes with a dual Z-axis rail that provides stability while printing. For those who have trouble understanding this, a 3D printer practically melts a material and reshapes it on a plain surface. For the design to come out right, the surface has to be fixed and stable, which otherwise would result in wastage of material.
Using the Photon S Workshop, you can quickly learn and enjoy 3D printing. Unlike other printers in this list, the Anycubic Photos S works on LCD shadow masking. With a 2560*1440 screen, UV lighting helps in increasing precision. The way resin printers work is that they use a UV lamp to cure your design, one layer at a time. Dual fans help keep the temperature under control. You also get a touch screen to control and monitor the operation with this one.
Reasons to Buy
Perfect for kids and 3D printing beginners
It comes assembled out of the box
Reliable resin printing solution
Reasons to Avoid
Functionality and usage limited to resin printing
Specs
Print Principle: LCD shadow masking
Print volume: 115*65*165 mm
Machine size: 230*200*400 mm
Machine weight: 5.9kg
Print Resolution: 2K resolution
Print Speed: 20 mm/h
Filaments: UV Resin
Connection: USB Cable
Touch screen: Yes
Bottom Line
If you are a beginner and you wish to learn the basic of 3D printing without experimenting with a really expensive machine, the Anycubic Photon S is the right choice for you.
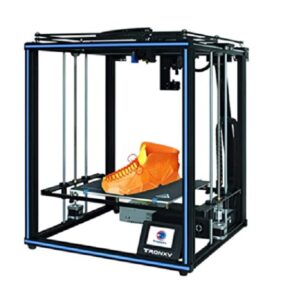
A product priced at $399, the Trony X5SA is a mighty machine. Being an FDM machine, the device can print a design as large as 330*330*400mm. With a printing accuracy of up to 125 microns, it comes with a 3.5″ touch screen, making it easy to use. The detachable aluminum plate makes the whole module convenient to use.
You would have to put in some time to assemble this affordable 3D printer. Hence, it is not for complete beginners, but it can be the right choice for someone with prior experience handling printers. The print speed can vary between 20 to 100 mm per second. However, you can work with a large number of filaments. Whether PLA, ABS, wood, polycarbonate, or ABS, you are good to go.
The heated bed can go up to 100C, and the nozzle can handle temperatures as high as 275C. The dual-axis guide rail can slide at high speed, maintaining the precision of your design. The structure is stable and provides high molding accuracy. You can upgrade or even change the accessories that make up the whole printer. The Titan clone extruder is praised by users worldwide, especially with a 1-year warranty.
Subtle features like filament run-out detection and auto-leveling ease the experience. While the company also advertises power cut detection. The Trony X5SA comes with Tronxy slicing software.
Reasons to Buy
Supports various filaments
Large print volume
Intuitive features like filament run-out detection and auto-leveling
Touch screen functionality
Reasons to Avoid
Not easy to set up
The software is lousy
Motor mounts are not made from metal
The cable supplied with the machine is not durable
Specs
Print Principle: FDM
Print volume: 330*330*400 mm
Machine size: 580*645*660 mm
Machine weight: 14kg
Print Resolution: 125 microns
Print Speed: 20 – 100 mm/s
Filaments: TPU, PLA, ABS, Wood, PC, etc.
Connection: SD card, USB Cable
Touch screen: Yes
Bottom Line
It is a good 3D printer to get hands-on, given that you have previous experience with such machines and want to buy a capable device on a budget.
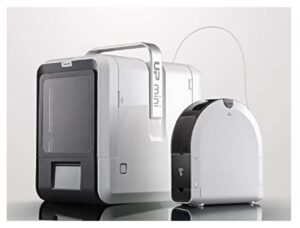
For beginners, the Tiertime Up Mini 2 is probably the best option. For $520, you get an assembled unit that is ready to print at command. The sleek and versatile design not only looks good but is equally versatile.
Just take out the machine, setup at a plain surface, connect your desktop or laptop, and you are good to go. Interestingly, the compact 3D printer can print as small as 150 microns and go up to 120*120*120 mm. A unique thing about this machine is the presence of the HEPA filter. With the filter in place, little to no fumes are generated while printing.
The perforated bed and closed chamber help maintaining the temperature while printing. It also helps in achieving the optimum print quality. The filament housing is separate from the printing module, which is suitable for its quality. Printing speed is on par with some costly options in the market.
You can use both ABS and PLA materials with the Tiertime UP Mini 2. The company does mention that you can print using PC, Nylon, and even Carbon Fiber can be used as well. It is one of the safest printers out there. The smart software can adjust nozzle height, features 9-point matrix leveling, dimensional and axial calibration, and even mobile functionality. All these features clearly justify the presence of Tiertime UP Mini 2 in the ’10 best 3D printer under $1000′ list.
Reasons to Buy
Perfect 3D printer for the beginners
An excellent choice for schools or student’s labs
Safe design with closed printing module
Supports a variety of materials such as Nylon, Carbon Fibre, and PC
Plug and Play functionality
Touch screen and Wi-Fi Support
Reasons to Avoid
Small printing volume
No heated print chamber
Single extruder
Specs
Print Principle: FDM
Print volume: 120*120*120 mm
Machine size: 255*365*385 mm
Machine weight: 10kg
Print Resolution: 150 microns
Print Speed: 200 mm/s
Filaments: TPU, PLA, ABS, Nylon, Carbon Fibre, etc.
Connection: SD card, USB Cable, Wi-Fi
Touch screen: Yes
Bottom Line
The Tiertime UP 2 Mini is one of the most secure, compact and efficient 3D printers out there. The combination of portability with accurate prints is what earns it a place in the 10 best 3D printer under $1000.
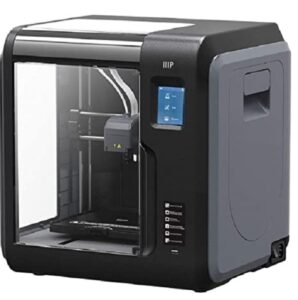
Another closed chamber, safe and compact 3D printer on the list, the Monoprice Voxel, is excellent. Due to the enclosed design, the temperature can be regulated during printing, decreasing warping. If you wish to print miniature designs, you are good to go. This machine can print as fine as 50 microns.
Unlike other products in this price range, Monoprice Voxel’s nozzle can be changed in no time. While the machine might look like a small microwave oven, it looks good. You can print a design as large as 150*150*150 mm, which can easily be detached from the removable print plate. That would not take much time, as the machine comes pre-calibrated. Just take it out, plug and print. It makes this device ideal for beginners.
Using the touch screen, one can adjust the distance between the bed and the nozzle. The filament detection sensor automatically pauses the print until reloaded. It features an internal memory, a Wi-Fi Radio (with hotspot), and a camera in the printing module to keep an eye on your design. The Monoprice Voxel 3D printer is compatible with Windows 7, 8, 10, or Linux. You can visit the official website to download the printer software.
Reasons to Buy
It comes assembled out of the box
Looks are good
It comes with internal storage and Wi-Fi
2MP inbuilt camera
Auto calibration
Perfect for beginners
Reasons to Avoid
Fewer materials supported
Small print volume
Specs
Print Principle: FDM
Print volume: 150*150*150 mm
Machine size: 400*380*405 mm
Machine weight: 9kg
Print Resolution: 100 – 400 microns
Print Speed: 100 mm/s
Filaments: PLA, ABS
Connection: SD card, USB Cable. 8GB of internal storage. Wi-Fi
Touch screen: Yes
Bottom Line
Considering the price point, the Monoprice Voxel is full of intuitive features that make it a very modern solution to your 3D printing needs. Additionally, it looks really good, making it one of the best affordable 3D printers out there.
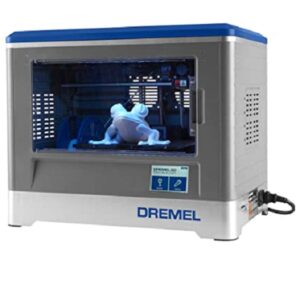
Priced around $600, the Dremel Digilab 3D20 is well suited for beginners. Firstly, it comes with an assembled printer module. The quick start guide would make you printing in no time. So, if you are buying your first printer ever, this could be an easy choice. The open system on this one allows you to download and print free models. Otherwise, you are free to create your designs using CAD software.
Secondly, the fully enclosed printing chamber and non-heated bed make this machine one of the safest ones. It also prevents anyone from actually touching the filaments, especially when the printer is working, which otherwise could lead to severe skin burns. Operating the device is no hassle with a large, 4″ color touch screen. The printer comes preloaded with Dremel’s 3D slicer software to assist you with your designs.
In terms of resolution, you can go as sharp as 100 microns. The Dremel Digilab 3D20 comes with a 500g spool of recyclable, non-toxic PLA filament. The material is plant-based and does not harm the environment at all. With a one year warranty, feel free to experiment with different designs and shapes. Dremel is known for its customer support services, which provide a solution for your problem in no time.
Reasons to Buy
Budget-friendly capable device
An excellent choice for beginners and students
Easy to use – comes assembled
The PLA filament is non-toxic and environment friendly
Comes with Dremel’s 3D slicer software
Top pick if safety is a concern for you
Reasons to Avoid
It might be challenging to find Dremel’s original filament once you run out of the included spool
No auto-calibration feature
Specs
Print Principle: FDM
Print volume: 230*150*140 mm
Machine size: 400*485*655 mm
Machine weight: 7kg
Print Resolution: 100 microns
Print Speed: 100 mm/s
Filaments: PLA
Connection: SD card
Touch screen: Yes
Bottom Line
If you are confused regarding several options and you just want to get started with 3D printing, this is the machine for you. It offers standard quality at a decent price, excelling at being an affordable 3D printer.
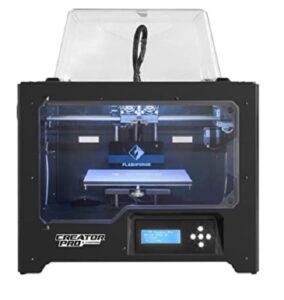
The device came into existence in 2014, and since then, it has only been improving. The machine offers you excellent quality and control over your designs. The whole printing mechanism is securely placed inside a stable metal frame. A 6.3mm print bed remains perfectly leveled even under high heat. For a price of $699, the FlashForge Creator Pro is a fantastic product.
Since its launch, the FlashForge Creator Pro has received tons of updates. With a new front door and a redesigned polycarbonate top, you now have better access to your prints. The new wiring router protects the connection from wear and tear. You can even remove the top door if you are working with PLA. Since it is an open-source machine, you can use your software and hardware.
You can easily use different colors on this 3D printer. Thanks to the dual extruder, it does not even take much time. The dual extruder is more efficient in printing highly detailed designs. And with multiple material support, the printers can run on ABS, PLA, HIPS, and T-glass. The printer comes with an LCD, heated bed, and a plug and plays setup out of the box.
Reasons to Buy
Easy to use – comes assembled
A robust metal frame with removable doors
Metal platform with Z axis movement
Multiple materials supported
100 microns resolution
Two extruders
Reasons to Avoid
Poor software support
No touch screen display
Specs
Print Principle: FDM
Print volume: 227*148*150 mm
Machine size: 476*332*383 mm
Machine weight: 19kg
Print Resolution: 100 microns
Print Speed: 40 – 160 mm/s
Filaments: TPU, PLA, ABS, Pearl, Metal, etc.
Connection: SD card, USB Cable
Touch screen: No
Bottom Line
If you wish to spend $700, this would be the right machine as it supports various printing materials and it comes with a sturdy built. The print volume is significantly larger than what the beginner printers offer, fetching the FlashForge Creator Pro a place in our compilation of the best 3D printers out there.
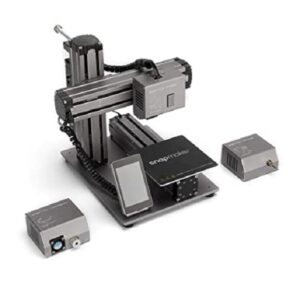
A true all-rounder on the list, the Snapmaker 3-in-1 3D printer is much more than a standard printer. You can interchange the module and use it as a CNC carving machine or as a laser engraver. While you usually have to buy three different devices for all that, this highly cost-effective option can do it all. Still not happy? Well, you can upgrade your device by adding another laser cutting module. The introductory price for this machine is $719.
The all-metal build allows it to be perfectly stable while printing. However, if you are a beginner, you might have trouble assembling as the Snapmaker 3-in-1 3D does not come assembled. Nevertheless, you can refer to the instructions given in the manual while putting together this capable device. Work with various materials – Metal, Fabric, Carbon Fiber, Wood, and the most common Poly Lactic Acid.
Now, the first images of this product might make it look like an open unit. But they have slipped in a thin enclosure in the package, which offers you a slight quitter and safer printing process. You can print as fine as 50 microns, engrave using a 200mW laser, and carve using the 3.175mm shank. All in all, if you wish you turn your desktop into a workshop, and you know a thing or two about 3D printing, this one is for you.
Reasons to Buy
Multifunctional module – 3D printing, CNC carving, Laser engraving
Good for teaching students
The metal structure provides additional stability
50-micron precision
Comes with Snapmaker – the built-in software that makes every task easier
Affordable
Reasons to Avoid
The machine might be a little too noisy at times
The enclosure provided does not solve the purpose
You might want to handle the device carefully, especially while using laser engraving
Specs
Print Principle: FFF – FDM, CNC Mill
Print volume: 125*125*125 mm
Machine size: 272*332*289 mm
Machine weight: 12kg
Print Resolution: 50 microns
Print Speed: 100 mm/s
Filaments: ABS, PLA, Wood, Leather, Carbon Fibre, Plastic, Metal, etc.
Connection: SD card, USB Cable
Touch screen: Yes
Bottom Line
Being a printer, engraver, and a CNC mill, the Snapmaker 3-in-1 3D printer is a multi purpose machine. You can produce highly detailed design with ease. The support for various materials makes this a machine for the experts. That makes it an integral part of this 10 best 3D printers under $1000 list.
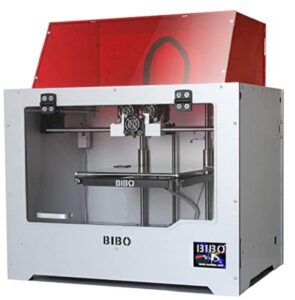
With the help of two extruders, this Bibo 3D printer is capable of copy printing. You can easily print two objects at the same time, which decreases your print time significantly. A significant advantage of a dual extruder 3D printer is – you can print an item in two colors. As with a single extruder, the filament has to be changed whenever you need a different color. Duel extruders carry two other filaments at the same time, just at $680.
The frame is made of a 6mm aluminum composite panel and comes with an acrylic front door and top hood. It ensures temperature control inside the frame, especially while printing with ABS filament. However, you might want to remove them while using PLAs, as it needs better cooling. That being said, it also can engrave on materials like cardboard, wood, and paper. The multi-purpose nature makes it one of the best 3D printers at this price.
Now, the machine can go as fine as 50 microns, which is a good detail. Other than that, you get a full touch panel, Wi-Fi control over this device, filament detection, and print memory. It simply means that you can give print commands to the Bibo Dual Extruder while sitting in your bedroom, using your mobile phone. The printer would stop immediately if you forget to refill the spool, and if the power goes down while printing, it will resume where it left. These features might look to be very simple but come in handy in real-life usage.
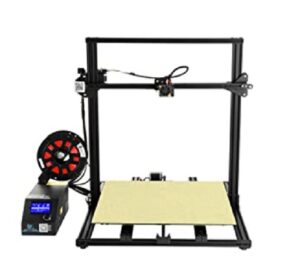
At $799, the Creality CR-10 Plus offers a large printing volume. Differentiating it from others in the list, a large printing area allows you to print real-life objects. You can print a 1:1 human figure in just 3 drills.
You might have to spend some time before the Creality CR-10 Plus gets up and running. Unlike other gadgets, one has to read the user manual before messing with these giant, expensive machines. The wires are labeled, with only 3 parts that have to be put together.
During printing, the dual Z-axis screw rods help maintain stability and ensure high printing quality. Another cool feature here is the printing memory. As discussed earlier, if the power goes out during printing your favorite action character, the printer would immediately resume once it comes back. You do not need to start over again. It also saves printing material.
Creality CR-10 Plus is compatible with Linux OS, which gives it an edge over other options in the price range. You can connect the machine directly to your computer via USB or use an SD card to upload your designs to the printer directly. The largest printing volume in the price range, along with other features makes the Creality CR-10 Plus a favorite pick in 10 best 3D printers under $1000.
Reason to Buy
Supports a wide range of materials: PLA, Carbon Fiber, Wood, Copper etc
Large printing size: 500*500*500mm
Can print for longer durations
The MK10 nozzle extrusion can print with all materials
Up to 100-micron resolution
Linux Compatible – supports a bunch of software such as UG, 3D Max, Rhino 3D etc.
Dual Axis Z-axis provides stability while printing
Reasons to Avoid
Does not come with a touch screen
Absence of Wi-Fi
Does not come with an enclosure, (handle carefully as the module gets hot while printing)
Specs:
Print Principle: FFF – FDM
Print volume: 500*500*500 mm
Machine size: 878*340*759 mm
Machine weight: 14kg
Print Resolution: 50 microns
Print Speed: 40 – 160 mm/s
Filaments: PLA, Copper, Carbon Fiber, Wood, etc.
Connection: SD card, USB Cable
Touch screen: No
Bottom Line
Fun Fact: The Creality CR-10 Plus comes in three colors – Orange, Blue, and Black. So if you need a capable 3D printer in a unique color that can print large objects with ease, this one is for you.
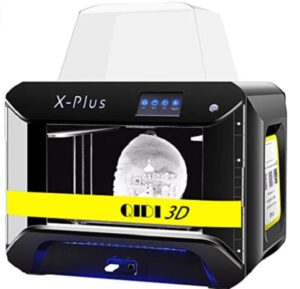
A machine from the Qidi family, the Tech X Plus is a decent offering for $799. For starters, you can print as fine as 50 microns or as large as 270*200*200 mm. However, the price keeps fluctuating up to $999. Nevertheless, even then, it is one of the most advanced and feature-rich 3D printers.
The Qidi Tech X Plus comes with a dual extruder. As also discussed above, the second extruder allows a 3D printer to use two colors simultaneously. Well, that is not enough! With a dual filament compartment, you can use a combination of materials. The dual-heated print bed increases the printing speed and allows for precise control over the design.
The slicer software is quite capable. Qidi says that they have redesigned the software to improve features and usability. The latest version enhances the print quality and speed by 30% and 20%, respectively. The software support is free for a lifetime, with regular updates.
You can print with PLA, ABS, Nylon, TPU, Carbon Fiber, and several other materials. As far as external connectivity is concerned, the device comes with Wi-Fi, Ethernet, and even USB ports for wired connections. The best part is, you can control all the aspects using a 4.3″ touch screen panel.
While the printer kit has two different extruders, the machine ships with extruder A to support general materials. If you wish to print with Nylon or other advanced materials, you can switch to the extruder B. Depending upon your needs, you can place the filaments either inside or outside of the printing chamber. If you face any issue or need guidance for assembly, please contact Qidi Tech Team.
Reasons to Buy
Dual Extruder for using different colors
Two Filament Compartment for using different materials
Z-axis calibration for additional stability
Dual heated bed for quick printing
Large touch screen for controlling the machine
Connectivity options such as Wi-Fi, Ethernet, and USB port
Supports a variety of materials
Reasons to Avoid
Not for beginners
No laser engraving
No SD card support
Specs
Print Principle: FFF – FDM
Print volume: 270*200*100 mm
Machine size: 710*540*520 mm
Machine weight: 23kg
Print Resolution: 100 microns
Print Speed: 100 mm/s
Filaments: PLA, Copper, Wood, Carbon Fiber, etc.
Connection: USB Cable, Wi-Fi
Touch screen: Yes
Bottom Line
If you are looking for an all purpose 3D printer, this one is the right choice for you. Enjoy printing with multiple materials over Wi-Fi, get the Qidi Tech X Plus. With this, we end the 10 best 3D printers under $1000 list.
So, there it is. The list of 10 best 3D printers under $1000. We have covered a diverse price range, making this the only buyer guide you would need to read before getting your first 3D printer. Whether you are a beginner, or you have a certain experience, the devices in this list cover all your needs. We sincerely hope that this guide was able to solve your doubts and suggest you something worth your time.
Smartphones have become an integral part of our lives, and we can’t think of living without using a smartphone. Android phones are one of the most popular smartphones, probably because they’re easy to use and affordable. Most of us use smartphones for not just calling, but for doing various other things, such as browsing the internet, using social media to connect with friends, writing emails, and many more. For all this to happen smoothly, our phone should be in a good and optimized condition. Here in this article, we’ll be learning how to clear cache on Android phones.
Our phones have limited storage, and it fills up quickly over time for various reasons. One of these causes is that the apps you use regularly create new files on your system to store some temporary information. These temporary data files are called cache, and they use up a fair amount of your Android phone’s storage space. These cache files fill up your storage space over time and hamper the device’s performance or simply, slows it down. Let’s take a look at what cache files are and how to clear them on Android.
What are Cache Files or Cached Data
Whenever you use an app on your Android, it stores some temporary data in the form of cache files on your phone. The phone does this to the static content or repetitive files to quickly recall associated information when you open the app again. For example, your web browser caches images, javascript files, and other data, every time you visit a new website or a URL. So, when you visit the same website or URL again, your browser doesn’t have to load the resources again each time. Similarly, other apps cache some files in the phone’s memory to enhance the user experience in terms of speed and fast loading times.
On one hand, cache files increase your browsing speeds; they also slow down the overall performance of your phone by filling up your phone’s storage space over time. So, it becomes necessary to occasionally clear cache on Android to free up some storage by removing expired and unnecessary cache files. Further, note that a cache file is only useful to the associated application. For example, cache stored by Instagram can only be used by Instagram, and not Google Chrome or Spotify. In many cases, the apps automatically discard the unnecessary or expired cache, but sometimes we may need to manually clear them. Like, when an app starts misbehaving, or an app like Instagram stores too much cache and fills up a lot of the device’s storage space. Here’s how to delete or clear cache on Android.
How to Clear Cache on Android
In earlier versions of Android, there used to be an option in device settings to clear all cached data from the phone. But now, in modern versions of Android, users need to delete cache files for each app individually. Though you don’t need to delete all cache across your device, you may sometimes need to clear cache from some misbehaving app to fix an issue. In most phones, there’s a dedicated application (like Security in Xiaomi phones, Files by Google on some phones, or some other app in other phones depending on what brand you have) to clear junk files from your Android. However, if you want to individually clear cached data for an Android app, follow the given steps.
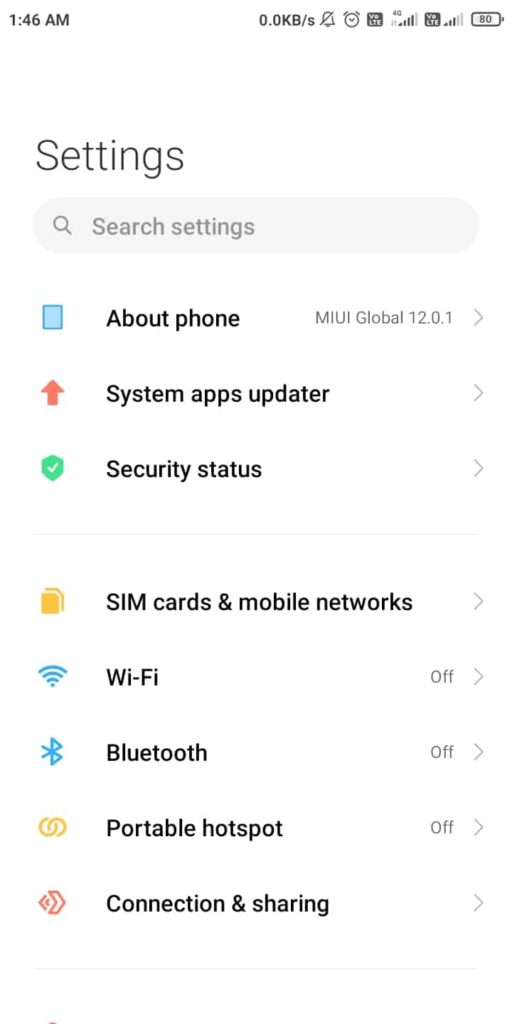
Note: We’re using a Xiaomi smartphone with MIUI 12 for this guide, but other phones also have a similar option. Follow accordingly.
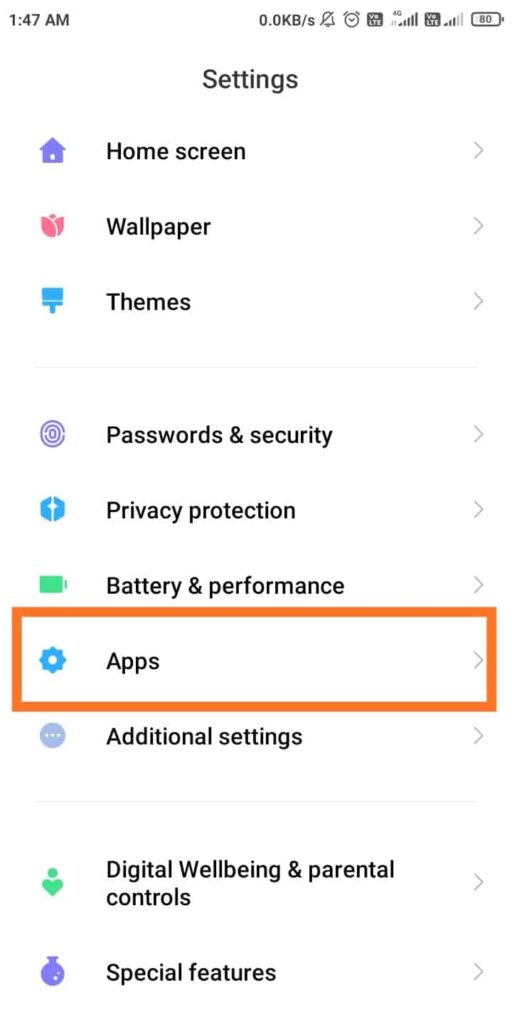
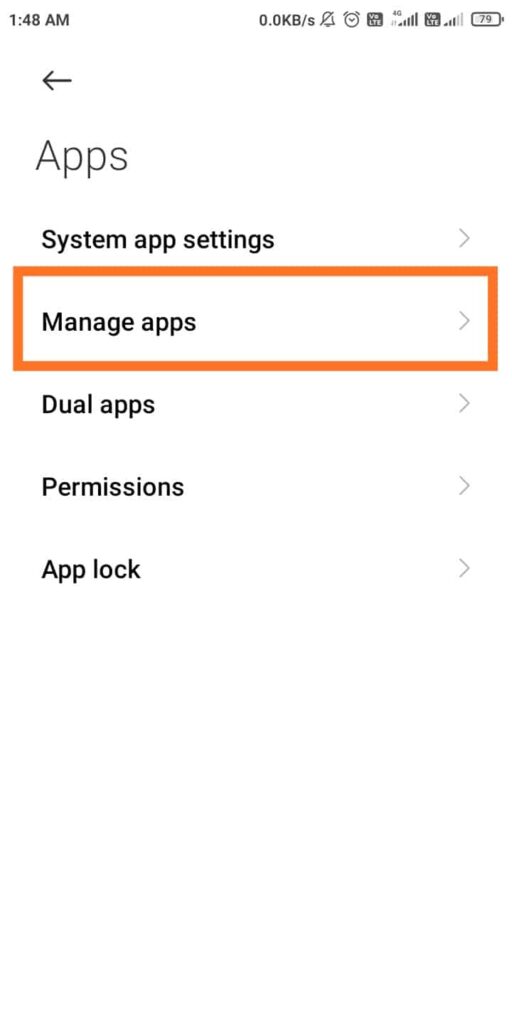
1. Open Settings in your smartphone and then select Apps (or Manage Apps).
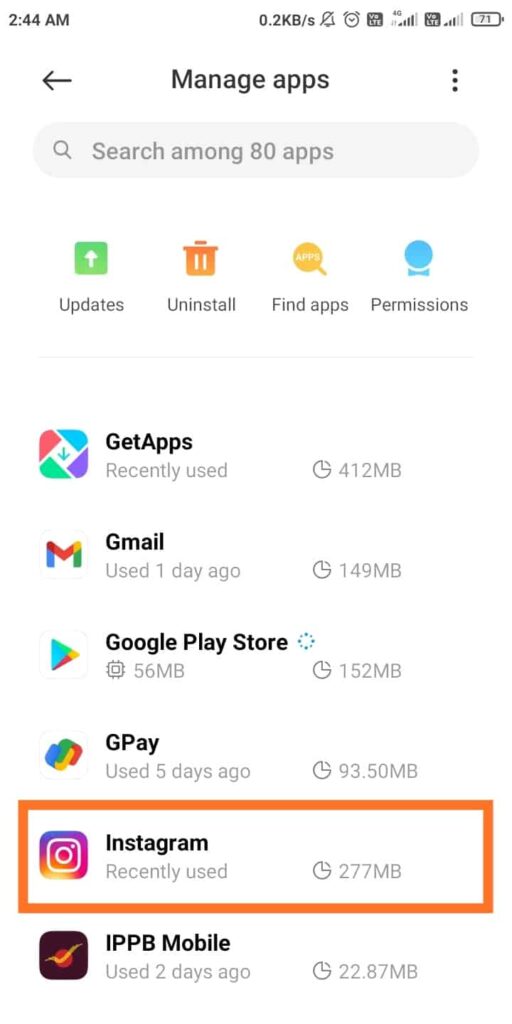
2. Now, you’ll see a list of installed apps on your phone. Select the app you want to delete the cache for.
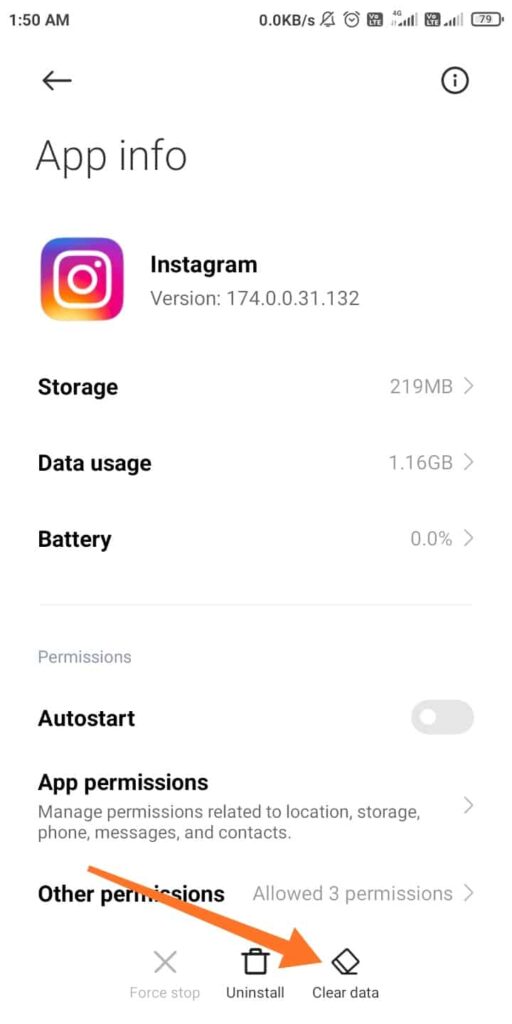
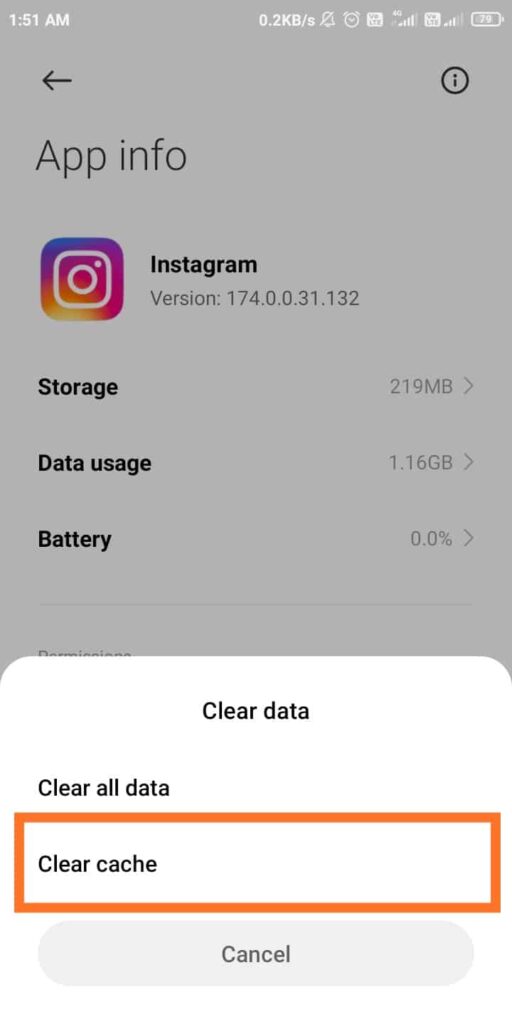
3. You’ll now see the app’s info page. Now tap the Storage option and click Clear Cache. In Xiaomi phones, you first need to tap Clear Data and then click Clear Cache.
4. Alternatively, you can directly click the Clear Cache or Clear Data button on the app’s info page, if available.
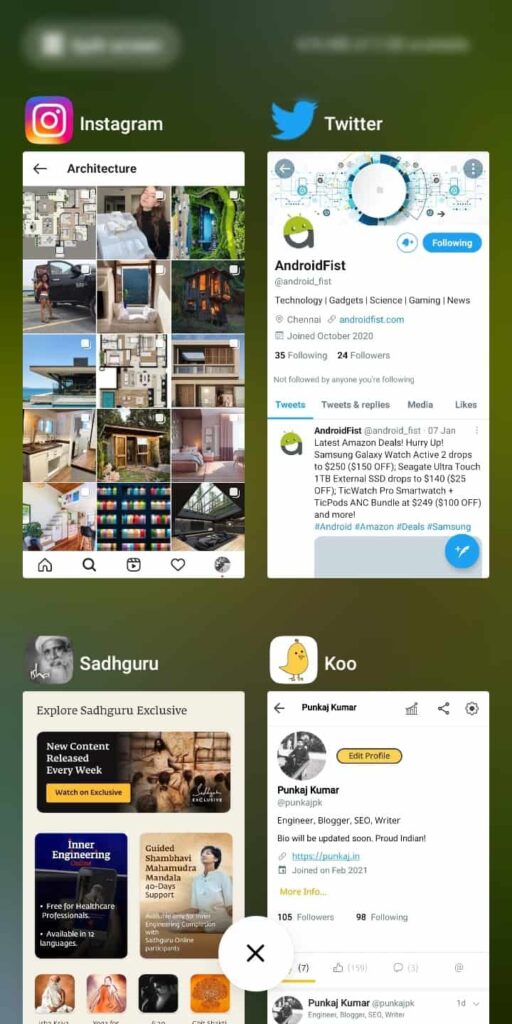
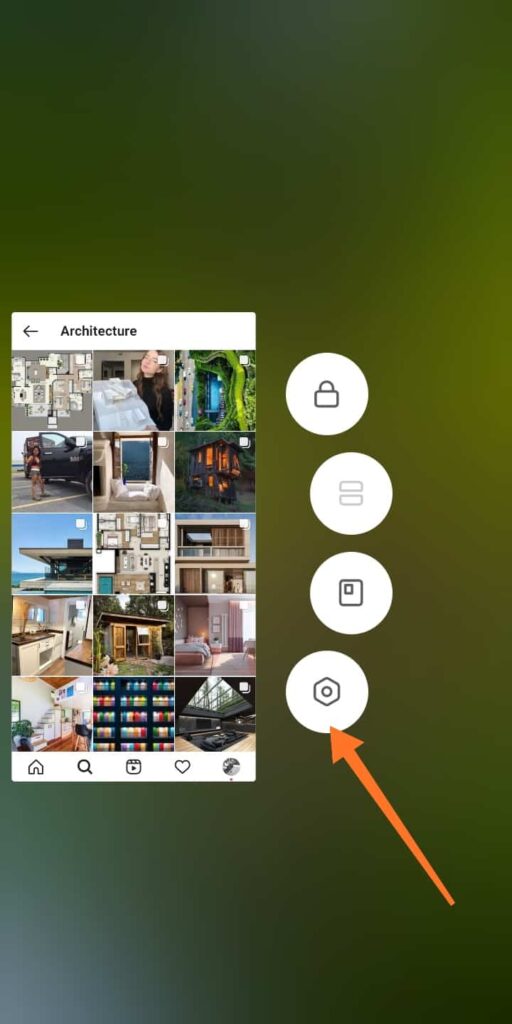
That is all you need to do to clear cache for any app on your Android. Alternatively, you can directly go to an app’s info page by long-pressing the app on the Recents screen.
Note: Don’t click the “Clear all data” option, it’ll delete all data, including cookies and logins from the app. This means that the app will look afresh like you’d just installed it from the Play Store.
If you still have a phone with an older Android version, just go to Settings » Storage » Cached Data to delete all cache files.
Delete Cache in Chrome Browser on Android
Sometimes you just want to clear the cache on Google Chrome for Android to limit the number of files you want to delete. Follow the steps to delete or clear cache on Google Chrome for Android.
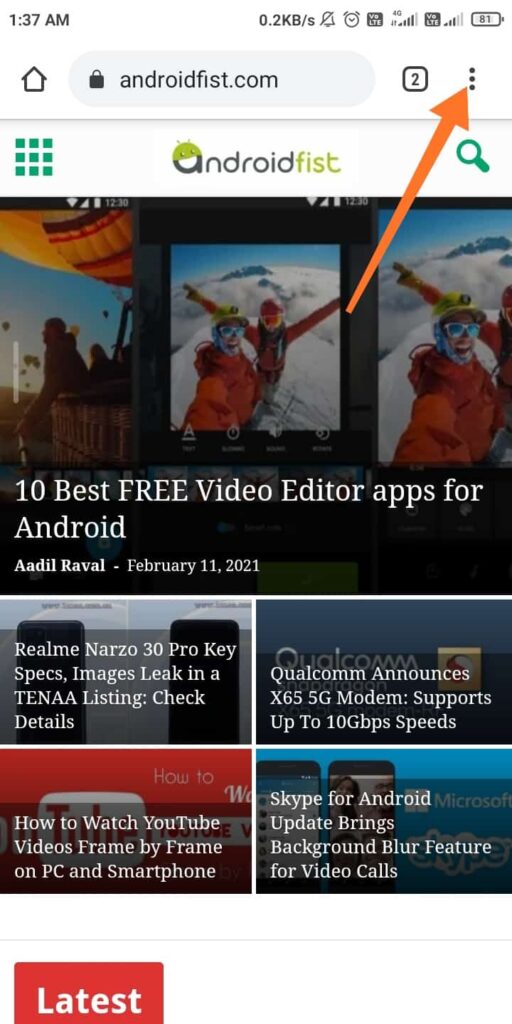
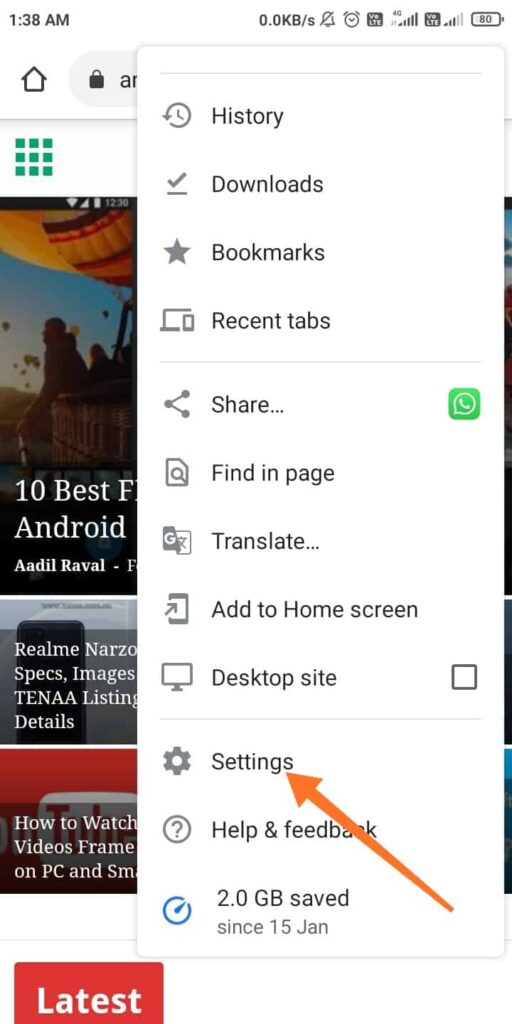
1. Open the Chrome browser on your Android and tap the three-dot menu on the top-right corner.
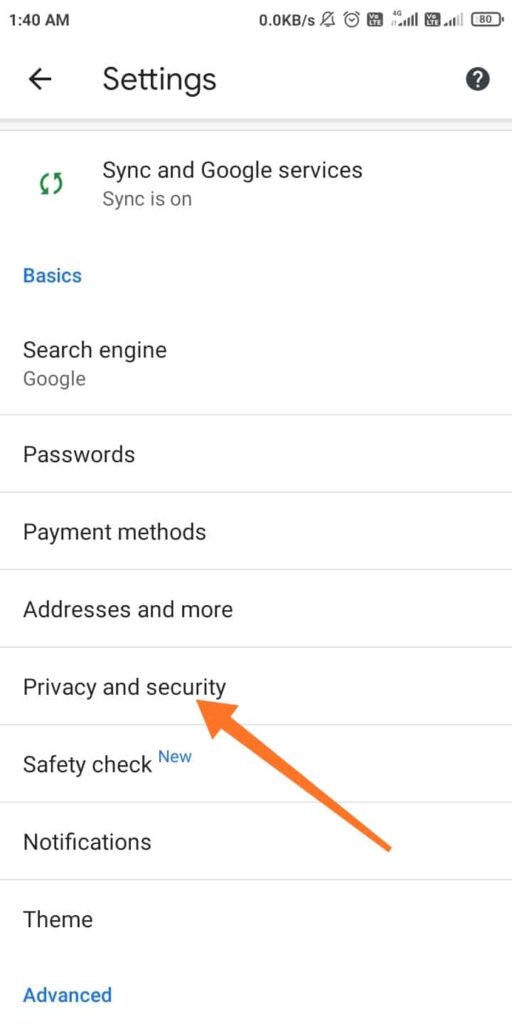
2. Next, select Settings and then tap on “Privacy and security.”
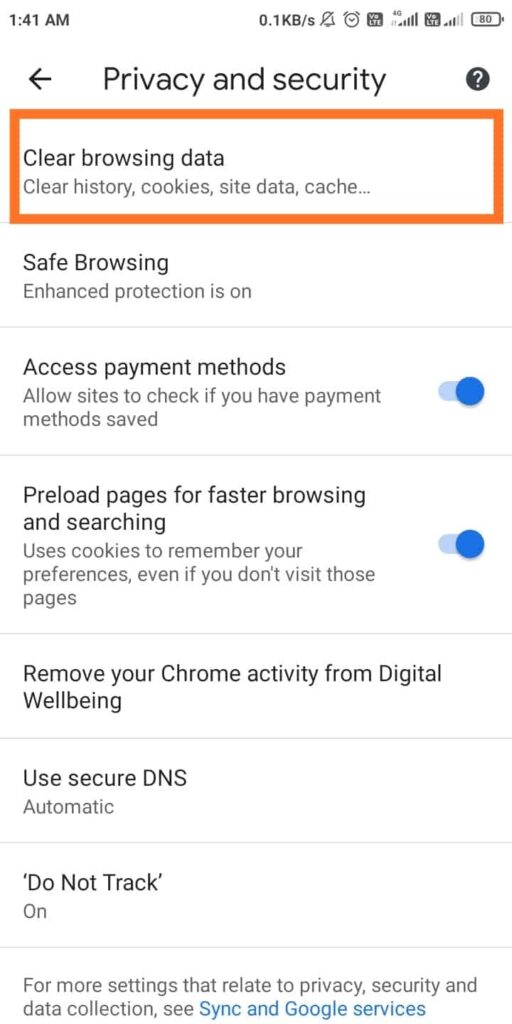
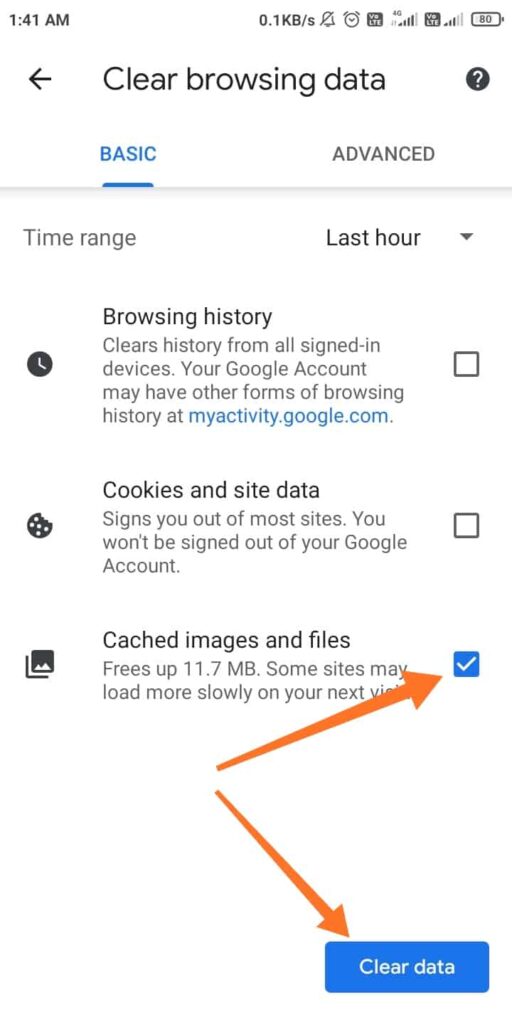
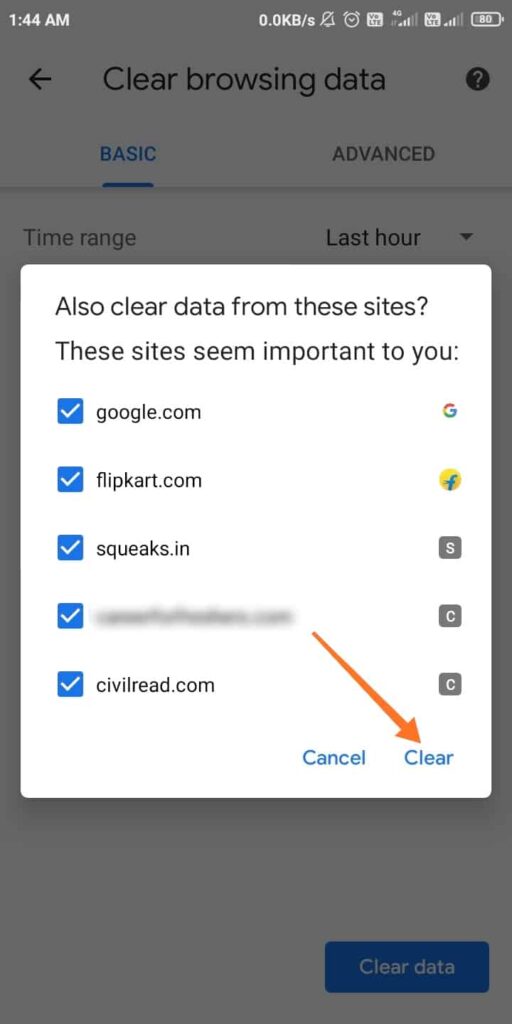
3. Now tap on “Clear browsing data” at the top and select the “Cached images and files” checkbox.
4. Now just click the “Clear data” button at the bottom right to clear cache files on Google Chrome on your Android phone.
Note that other browsers also have a similar option and you can go through the steps accordingly.
Benefits of Clearing Cache on Android
To be frank, cache files are important for apps to work and load fast, and you typically don’t need to do anything with them. However, it is sometimes useful to manually clear cache from your Android phone for the following reasons:
1. Generally, clearing cache helps you save storage space on your phone for the short term. But this is temporary, as the apps continuously create new cache files whenever you use them.
2. Sometimes a web browser or an app refuses to fetch the latest version of a page, and clearing cache forces it to update it with the latest version.
3. In some cases old cache files become corrupted and force the app to malfunction. So, deleting faulty cache files can solve such issues.
4. Another reason is security. Theoretically, old cache files can pose security risks and privacy threats. Some cache files saved in your web browser may contain sensitive information, and if an unauthorized person accesses these files, he might be able to obtain private details, such as emails and passwords.
What Happens After You Clear Cache Files
As said in the benefits of clearing cache files on Android, you’ll regain some storage space for some time. Also, if an app was misbehaving earlier then clearing cache might fix the issue and the app will continue to work as normal. However, as you have cleared the stored temporary data used to smooth out the performance, your app or browser will take some time to load the deleted elements next time you use the app. Like said before, the app will then again build the cache based on your usage.
Note that unless you mistakenly clear the cookies, clearing cache on Android won’t log you out or cause other major changes. You also won’t lose important data like browser bookmarks, browsing history, login details, game progress, or other similar data. For example, if you recently cleared the cache files for Chrome and you try to open a website that you frequently visit, it’ll take more time than usual to load the images. It is because the browser now fetches all the files like images, javascript, CSS, etc. from the server, which takes time.
Should You Clear Cache Regularly
Now that you learned the benefits of clearing cache and what happens after you clear cache files, you might think of manually clearing cache files regularly. But you should know that this is unnecessary, and in fact, counterproductive. As we said, cached files relieve the app from loading elements from the server and speed up access to the content you use regularly. So, deleting it will hamper your browsing experience and increase the loading times of your affected apps. That’s why you should not frequently delete the cache files, except the apps (maybe) that you don’t use often.
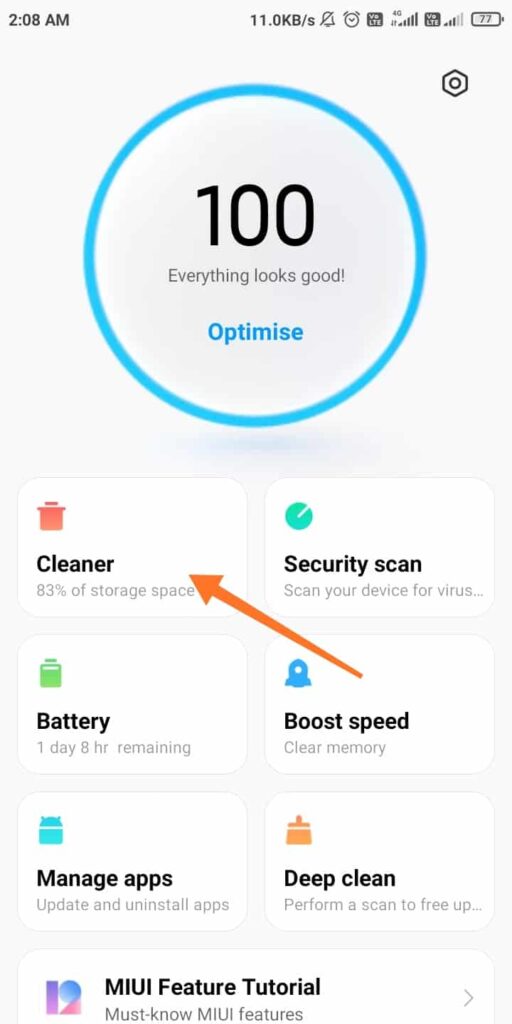
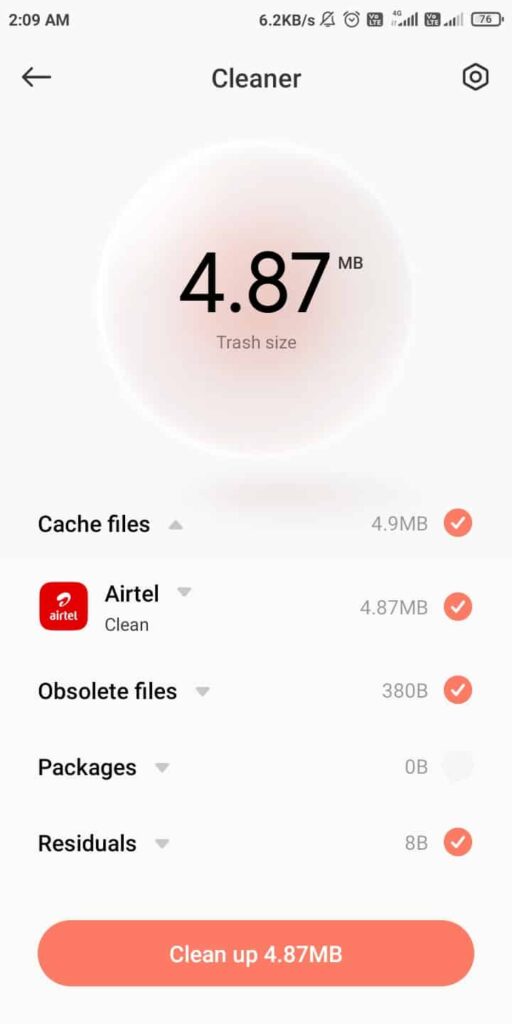
If your phone has an inbuilt app for this purpose, like Security or Files by Google, then you may use that app to clear cache on Android. For example, you can use the Security app in Xiaomi Redmi smartphones to clear cache. You can see the attached images showcasing how to clear cache and junk files on Xiaomi Redmi phones using its in-built Security app. Manually deleting cache files does not arise usually, except the following:
1. When an app’s cache files are corrupted that causes the app to misbehave.
2. Your device’s storage space is running out and you don’t want to delete images or videos.
3. You want to delete cache because of privacy issues, like deleting the files containing personal information to protect your privacy, etc.
If you think of using an Android cleaner app then there are a lot of apps on the Playstore. However, most of those apps often make false claims, and on top of that, they’re full of ads. Avoiding them would be an intelligent choice because those apps themselves would take more storage space than the cache files you would want to clear.
Conclusion
Clearing expired or unnecessary or unused cache files on Android is a good way to free up space on your device, though temporarily. It is also helpful in fixing and troubleshooting some problematic and misbehaving apps. But, as said before, it is not something you should do regularly, as they’re important to smoothen the performance of your apps. Clear cache on Android only when it’s needed, or if you want to clear cache to fix storage issues, then clear cache files for Instagram (though it’s my personal view).
To learn more tips and tricks related to smartphones, PCs, IoTs, or other gadgets, keep visiting AndroidFist.
Global social networking giant Facebook is reportedly working on a smartwatch loaded with health features that it plans to sell next year. It seems like the company now wants to foray into the smartwatch market. According to a report from The Information, Face is building an Android-based smartwatch that it wants to sell as early as next year. Currently, it’s not yet clear whether the smartwatch will use Google’s Wear OS or its own operating system.
As per the report, the Facebook smartwatch will come loaded with various health and fitness features. Though these features are common in smartwatches, the report claims that the social media giant’s smartwatch may come with a unique feature that will allow users to send messages from the watch directly. The report also reveals Facebook’s plans to start selling this smartwatch next year, ie., 2022.
Facebook Smartwatch Will Work via Cellular Network
According to the report, the first-ever smartwatch from Facebook will work via a cellular connection for allowing users to send messages through its services. The smartwatch can also connect to other services or hardware of health and fitness companies like Peloton Interactive. Facebook has already been foraying into the hardware sector in the last few years. The tech giant’s virtual reality headset Oculus and video chatting device Portal are an example.
Apart from this, the company is also reportedly working on Ray-Ban smart glasses and an AR research initiative called Project Aria. Not just the hardware, reports claim that the company is also working on developing an app like Clubhouse. As per a NYT report, Facebook has directed its product team to create an app similar to Clubhouse.
It’s a fact that the social media company takes a keen interest in its rivals. The company either acquires its competitors, like WhatsApp and Instagram or creates something bigger to overshadow its products.
Cameras mounted on smartphones can do a lot of stuff nowadays than what you can imagine a few years ago. A smartphone can capture a full-feature length movie and no one would do. But hey, it is not just the cameras but video editors on smartphones that play a major role in transforming pieces of videos together. It could be anything from clipping unwanted parts to include a ginormous intro or a collection of videos stitched together as well. All this is possible because of video editing apps and when it comes to Android, there are a plethora of options to choose from.
Your Android smartphone comes with both free and paid video editors. In fact, there are so many choices that you will be confused but that’s why we are here. Apparently, we dig into the various video editor apps available on the Play Store to find out the 10 best FREE Video Editor apps available. Here’s the list arranged in descending order of its popularity on the Google Play Store.
Inshot is a professional video editor app available on Android devices that helps capture the precious moments in a well-polished video. It has all the features you would need in a video editor including multiple audio and video channels, trimming and cutting videos, and merging pieces into one. You can add music, adjust the effects it follows, add a voiceover with Inshot. The app also offers a tonne of video transition effects and filters to toggle and get the best of the scene possible. You can export in HD quality in various formats and ratios suitable for respective platforms like YouTube, Instagram, TikTok, etc.
Video creation and editing are some of the trendy norms in today’s digital generation. All thanks to the evolution of social media platforms, giving every creator inside a person the rise they have always wanted. As social media applications are free to use, many creators are rising from scratch to showcase their talents and skills. So begins the search for the best video editor for free, or best video editor for beginners, etc. To help the search, InVideo is the one-stop solution to all your digital content creation needs. Let us explore more about this online-based video creator and editor software.
InVideo is an online-based video creator and editor based in San Francisco, California that provides the users with different sets of templates, stickers, overlays, filters, media libraries, and much more to help them create videos from scratch or help them edit their own set of clips. What makes InVideo even more unique is that it is recognized as the number one online-based video editing tool by G2 Crowd. Ready to try it, then scroll down for more details regarding the compatibility, support, and cost.
OS Compatibility: Microsoft Windows, Google ChromeOS, and Apple macOS.
Input Format Compatibility: MPEG-2 I-Frame SD, DVCAM, DVCPRO 25, AVCHD (M2T, M2TS, MPEG4, H.264), etc. Output Format Compatibility: Web-compatible file (MPEG4/H.264), WebM, Blu-ray, etc.
Cost: Free (trial version), Paid ($180 to $360/Annum)
To summarize in brief, here are the pros and cons to help you decide whether it is worth your try or not.
Pros:
A robust and diverse media library consisting of over 4000+ elements and items that is available for daily video creation.
An intelligent video assistant (IVA) support recommends corrections or suggestions based on the content you are making.
The free version serves enough features to fulfil all the basic to mediocre needs for your video.
Cons:
It is an online-based tool, so an active and stable internet connection is always required.
3. KineMaster
Price: Free | Contains Ads | Offers In-app Purchases | Pro at $4.99/mo
OS: Android
Popularity: 100M+ Downloads
KineMaster is a literal master when it comes to video editing with powerful tools on-board. The app lets you trim, merge, cut, and crop videos. Controlling video speed, adding slow motion or time-lapse effect is one of the many best features. Perhaps, KineMaster is well known for exporting videos at 4K 21|60p resolution. Though you get a watermark on its free version, the app is pretty packed with features including voice changers, adding voice-overs and music, EQ presets, and others.
Check out its keyframe animation which is a powerful tool for animating in your videos all you want and on your smartphone. Unlike many other video editors for Android, you get a free trial, the free version is feature-limited. You will have to subscribe to its premium plans to keep using it.
Price: Free | Contains Ads | Offers In-app purchases | Pro at $5.99
OS: Android
Popularity: 100M+ Downloads
PowerDirector from Cyberlink Corp is among the best video editors available on Android. If done right, you can export high-quality videos that are no match for any other editor out there. It has features like keyframe controls, animated titles, voice changer, chrome-key editing with green screen, and more. Check out its array of blending-modes and overlays and you will be stunned. It has precise editing tools that include splicing, trimming, rotating, adjusting the color, multi-timeline controls, PiP overlays, tonnes of templates. Apparently, the list goes on.
As with any other video editor apps for Android that you would find, PowerDirector has a premium tier. It unlocks exclusive content, an ad-free interface, stock media, and plenty of professional editing features to name a few.
If you are really good at vlogging and want an app to edit those videos for you, VideoShow can be your pick. It is a professional video editing app for Android devices that offers HD export with no quality loss. It is easier for beginners to use and offers credibility to it. The app has special lenses to add, hundreds of royalty-free music to add, filters, and video styles to name a few features.
It has tools such as blur, reverse, trim, merge, zoom in and out, splice among others. VideoShow has video dubbing wherein you can add voice overs and sound effects too. It has a Materials Center where you’ll get endless sound effects, FX, images, filters, effects, and more.
If you have eyes on something that is frill-free, Quik is the ultimate pick. The app has multiple video styles according to which it creates short videos when you add photos and video clips in the app. It is compatible with all GoPro devices as well as Google Photos, your gallery, cloud storage, and so on. You can easily reorder the files, rotate or trim and do overlays and more with the input and let the app take care of the rest.
It may be lacking advanced video editing chops but it is a frill-free, easy to use video editor that is available free of cost. There are no hidden charges as well.
Price: Free | Contains Ads | Offers In-app purchases | Pro at $7.99
OS: Android
Popularity: 50M+ Downloads
FIlmoraGo from Wondershare isn’t that ordinary video editor app you have heard of but rather a powerful one. It is a full-featured video editor with powerful tools including cutting, trimming, cropping and merging of pieces of videos. The app allows exporting videos in HD quality where users can actually select the aspect ratio and resolution as well. It has plenty of built-in royalty-free music that you can use.
With FilmoraGo, you get audio and video speed and enhancement functionalities as well. You can add text, customize the font style, add emoji and stickers, create memes, and more. Its premium tier relieves you from any ads and unblocks all the features that were under the paywall on FilmoraGo.
If you are new to video editing and want to make something interesting, Magisto can be of great help. The app uses artificial intelligence to select the best fragments, add effects, graphics, and filters to create the best of shots. Magisto lets you combine several videos in one, music from its licensed song library, choose the style of videos, and more. The app has proven its caliber and no doubt it has because it has already charted more than 50 million downloads.
Customize the video further adding colors, fonts, texts, stickers, and so on. The premium tier unlocks no watermark videos, exclusive templates, styles, HD video clips, fonts & and more.
If it’s all about short videos for YouTube or any social media handy, Funimate Video Editor is the perfect tool. The video editor transforms usual bland videos into a piece of art with more than 100 advanced video effects to choose from. Funimate Video Editor is not that powerful but it is worth a shot if you want something which is fuzz-free, simple, & gets your attention on social media.
Its list of features is extensive that includes video masking, AI effects, intro and outro effects, keyframes among others. Add music, chop down videos or merge several of them and son. Participate in the Funimate video editing community to showcase your skills and to learn more cool stuff you can do.
Another short video maker, you will be stunned just how good the Alive Movie Maker is once you use it. The app gives you motion track animation effects which is something you won’t find on most video editing apps. Check out the free timeline editing feature, add effects motion tracked with ease, add music, and more on Alive.
Alive is a great way to edit videos for Instagram and it can handle YouTube videos too. I have a community of videographers that you can check out and learn. With all the intuitive editing tools at your disposal, you would be unstoppable with Alive.
One of the two Adobe video editors available on Android devices, Adobe Premiere Rush does bring a lot to the table. It is an all-in-one video editor that brings pro-quality video editing chops such as trim, flip, add, splice, and more. It has a drag and drop interface along with a multitrack timeline so that everything is neatly arranged. Get your hands on a tonne of royalty-free music with Premiere Rush.
There are many features that make it potentially one of the best including cloud syncing, speed adjustments, color presets, automatic reframe to name a few. Subscribing to its premium plan unlocks any advanced features such as auto-ducking, a library of overlays, titles, and animated graphics, and so on.
And with that, we conclude this listicle for the 10 best FREE video editor apps for Android that you must have a look at. Do let us know which one actually made it to your smartphone and which one disappointed you.