
Autocorrect is a useful as well as an annoying thing that we encounter daily on our smartphones. Android brings support for many third-party keyboards which, further provide even more customizations and personalizations options. Today, I’ll be explaining how to change autocorrect settings on the Android system.
Let’s begin!
Steps To Change AutoCorrect Settings
AutoCorrect is one such feature that is a part of any keyboard’s machine learning. In some situations, autocorrect saves the day, but in some conditions, it creates an awkward scene by autocorrecting the words which you meant to write. It uses various algorithms and machine learning to understand your vocabulary and predict the next word accordingly. Sometimes, it saves a lot of time as we don’t have to write the complete sentence, and we can just tap on the words that we want to write, but sometimes, these predictions do get wrong as it might show some words that are off context.
The steps to change autocorrect settings are explained below.
- Open the ‘Settings’ application.

- Go to the ‘Keyboard & input method’ section.

- Under the ‘Available Keyboards’, tap the keyboard that’s installed on your device.

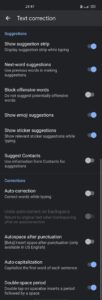
- Tap the ‘Text correction’ option.

- There you will see all the options to customize the autocorrect settings.
Conclusion
Try out some different options to change autocorrect settings and experience it while you use your keyboard. You can toggle on/off many other options that are linked to autocorrect settings like Auto-capitalization, punctuation mark, etc.
Lastly, dropdown your views, comments, or any feedback for further assistance, and we shall see you in the next one.


