
Suppose you notice something interesting on your laptop, desktop, or smartphone, and you want to share it immediately with your peers taking a screenshot is the most efficient way to share this exciting information in the least time. Screenshots are helpful in other ways, such as sending error messages containing technical information to support teams, snipping an ecstatic moment during your gameplay, taking shots of images that you cannot save, and so much more. Windows, Mac, and Android operating systems provide an easy solution for taking a screenshot, but this is not the case for a Chromebook. So today, we are going to show you how to take a screenshot on a Chromebook.
Chromebook by Google came into the race with Windows and Mac-based laptops in 2011, featuring ChromeOS (based on Linux). Manufacturers such as Asus, Lenovo, HP, Samsung make Chromebooks and make them widely available. These computers highlight portability, robustness, and boast fluidity. But working with ChromeOS is hectic, especially for beginners coming from a non-technical background. Therefore we provide you with a comprehensive and engaging guide on how to take a screenshot on a Chromebook. Later on, we also include some extra things we can do with these screenshots.
Ways to Take a Screenshot on a Chromebook
Grabbing a screenshot on Chromebook is slightly tedious than doing the same Windows or Mac laptop. But through this article, you can learn to take a full screenshot, a partial screenshot, taking a screenshot with a stylus, and using Chrome browser extensions.
Important: The keyboard layout of all Chromebook models is the same, so be assured that the images given will be the same as your Chromebook.
This method is the easiest way to take a screenshot. We can save the entire screen’s image with a simple combination of keyboard buttons. The screenshot gets saved in the Downloads folder. So let’s see how to do it:
- Move to the screen with the exciting content. Press the Ctrl button, and while pressing it, push the []]] (Show Windows) button.

- The screen will dim for a second and then light up, suggesting that the screenshot has been taken, indicated by notification on the bottom-right corner of the window.

Taking a partial screenshot is essential when we want to extract the required portion of the screen rather than the whole, thereby making this feature a powerful editor. We can use this to create an image from non-downloadable material, focus on a particular portion of the information, and so on. Here are the steps for it:
- To take a screenshot of a specific section of the screen, press Ctrl, then Shift, and while holding both of them down, push the []]] (Show Windows) button.

- The screen will dim, showing a cross-shaped cursor, using which you can draw a rectangular area over the critical part of the screen.

- After finalizing the box and releasing the finger from the touchpad, the small screen rectangular area is saved directly to the Downloads folder.
3. Taking a screenshot with a stylus
If you own a Pixelbook, Pixelbook plus, Samsung Chromebook Plus, or any other stylus-based Chromebook, there is already an option present separately for the stylus.
- Using your stylus, tap on the pen-shaped icon on the screen’s bottom-right corner to the left of the notification area, which will open up a popup menu.

- From the popup menu, you can tap either “Capture region”( which will provide the option of taking a partial screenshot) or “Capture screen”(helps us taking a full screenshot). And as always, the screenshot is saved in the Downloads section.
4. Taking a screenshot with Chrome extensions
Chrome extensions are beneficial for taking screenshots when we take screenshots regularly, and we need to find a simplified solution for sharing and storing such pictures. We can find various free screenshot tool in the Chrome Web Store, but we include here our three favorite extensions along with their specialties:
- Nimbus Screenshot & Screen Video Recorder – Its facilities include taking full and partial screenshots, editing tools, trim/crop tools, record video from screen and webcam.
- FireShot — Whole and partial screenshots, editing tools, send screenshots directly to Gmail.
- Scrn.li — Whole and partial screenshots, editing/annotation tools.

In order to use these extensions, go to the link provided and tap on Add to Chrome. After the download finishes, it will install automatically, and finally, you will be able to use the services offered by clicking on the icon of the extension.
Things you can do with Screenshots
Once we have taken a screenshot, many questions can arise in your mind. Where are these screenshots stored? How can we access them? Is there a way to modify/delete them? So in this article, we are also going to explore the answer to these questions.
1. Opening a screenshot
The Downloads folder contains all the screenshots grabbed using shortcut keys. This folder resides in the offline local storage of a Chromebook. Let us see how this works.
- Firstly, click on the Files icon from the app dock at the bottom. This action will open a window showing the local storage of the device.

- Double-click on the Downloads folder under the My Files subsection. The screenshots are listed here in PNG format(Portable Network Graphics). Their names contain the date and time corresponding to the moment a user captures them.

You can open these screenshots by double-clicking on them.
2. Editing a screenshot
After taking a screenshot, you may get the urge to draw something on it or remove a portion of it. In other words, you may need to edit the screenshot. For doing that, follow the steps below:
- Double click on the picture which you want to edit. The photo opens on a default photo editor. Click on the icon shown below.

- The editor will provide you with options like cropping, changing the brightness, temperature, color saturation, rotating the image, reversing the changes done, etc. The choices are shown accordingly here.

After applying these changes, click on save to save the image with the modified changes. It is essential to know that the original image will be deleted if you save it.
3. Deleting a screenshot
If you have taken single or multiple screenshots by mistake, you can delete them easily.
- Select the screenshot with a single click on it. Press ALT on the keyboard, and while holding it, press Backspace.
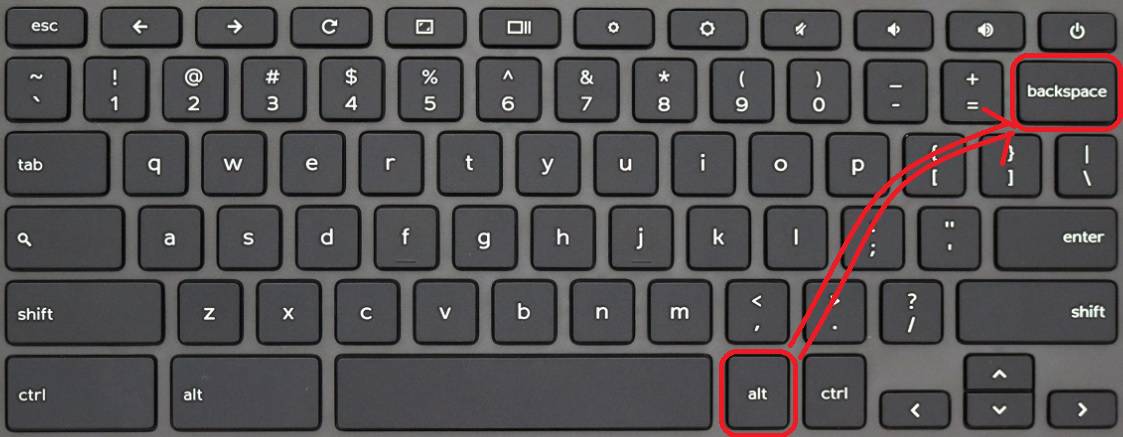
After pressing the key combination the file is deleted with ease.
Conclusion
Capturing screenshots is helpful in our day-to-day lives. It makes sharing information a piece of cake. We hope that our comprehensive article helps you to navigate through the tricky ways to capture and handle a screenshot on your Chromebook. Feel free to share this article and comment below to clear your doubts.
Image Courtesy: YouTube
Also Read:
How to Clear Cache on Android Phone – Complete Guide
How to Watch YouTube Videos Frame by Frame on PC and Smartphone


Very well written article 💯