
Last year, Samsung Galaxy Note 20 Ultra became one of the best flagship phones launched. It packs some of the great hardware and software combinations making the device a gem to use. As some of the features are restricted for development use, rooting is the solution one thinks of to experience it. So, today, I’ll be guiding you on how to root your Samsung Galaxy Note 20 Ultra using Magisk software.
What is Rooting
Rooting an Android device is like what jailbreak is to iOS devices. It is a process granting the users to gain complete control over their Android devices unofficially, allowing them to flash custom ROMs, manage bloatware and default applications installed, customizing the device with various animations and themes, installing MODs, and many more.
Advantages of Rooting
- Extensive support to customizations.
- Full manual control over the kernel coding.
- Grants full access to manage applications, software, and bloatware.
- Ability to install custom ROMs, OS in BETA, or stable version.
Disadvantages of Rooting
- The device warranty gets void.
- Malware and hacking problems are more prone to rooted devices.
- The device may become useless if any step during the rooting procedure goes wrong.
- Once the device is rooted, it becomes officially unsupported by the brands irrespective of the warranty is present or has expired.
The Steps
A. Prerequisites
On Your Computer/PC
- Download and install the Odin Flash Tool on your computer.
- Search and download the Samsung Galaxy Note 20 Ultra Firmware that matches that of your device using the SamFirm Tool and keep it ready.
- Download and install the (7-zip or WinRAR) software on your computer for the extraction process.
On Your Note 20 Ultra
- Magisk Manager Application
B. Unlocking Bootloader On Samsung Galaxy Note 20 Ultra
- Open the Settings application on your smartphone.
- Scroll to or search for the About phone tab. Tap the Software information tab or search for it.
- Find the Build number section and keep tapping on it until you become a developer.
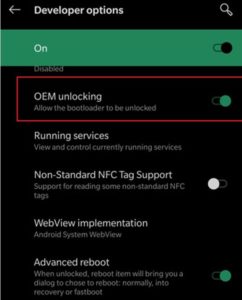
- Go to the main page of the ‘Settings’ tab and search for the Developer options section.
- Now, go through the inside of the Developer options and search for OEM Unlocking and USB Debugging tabs.
- Enable the OEM Unlocking and USB Debugging options.
- Once enabled, switch off your device. Press and hold both the Volume buttons and connect your phone to your computer using a data syncing cable (no charge only cable to be used).
- A warning screen will flash after which, release the Volume buttons and wait.
- Press the Volume Up button once to boot your phone into Download mode.
- Once booted into Download mode, long-press the Volume Up to enable the Bootloader on the Samsung Galaxy Note 20 Ultra, which will now proceed further in the wiping data stage.
- Once the step above gets completed, reboot your device and check for the status of OEM Unlocking in the Developer options menu and check whether it has been greyed out or not. If yes, then the bootloader of your Samsung Galaxy Note 20 Ultra was successful. If not, then try again with the steps carefully this time.
C. Rooting Samsung Galaxy Note 20 Ultra Using Magisk Tool
- Extract the firmware on your computer, and search for an AP file in the extracted folder. It’s a file named with AP in the beginning in the tar format.
- Extract the Odin Flash Tool zip file on your computer.
- Copy it to your phone’s internal storage.
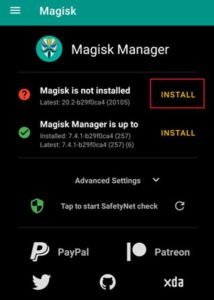
- Open the Magisk Manager application on your device and click on Install>Install.
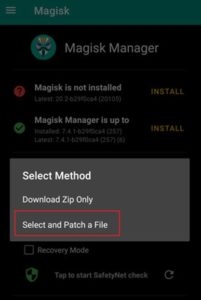
- As the installation progresses, a pop-up shows up, asking for the method selection. Here, select the Select and Patch a File tab. Browse the path and select the AP tar file that you earlier copied into your device.
- The patching process will now begin.
- When the patching process finishes, go to the Download folder of your phone, where, you’ll find a file named magisk_patched.tar.
- Copy that file from the Download folder to your computer and extract it.
- When done, you will find the boot.img file in the extracted folder. Copy it to your phone and perform the same patching steps as you did for that AP file.
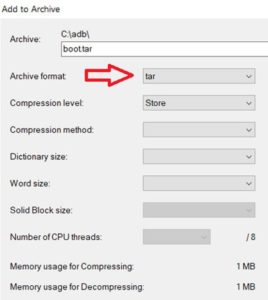
- Copy the (magisk_patched.img) to your computer and rename it to boot.img. Archive the above file in the tar format.
- Open the Odin Flash Tool on your PC and untick the Auto-Reboot options.
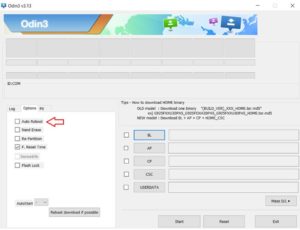
- Now, click on the AP button on the right-hand side and load the magisk_patched.tar (This is the file that you manually compressed earlier) file.
- In the USERDATA section, load the boot.img file that you patched in the earlier steps.
- Boot your Samsung Galaxy Note 20 Ultra into Download Mode. Now, connect it to your computer. Odin Flash Tool will automatically detect your device and blue color will display in the first stack.
- Click start. This will begin the process of flashing the patched Magisk file to your phone.
- A completion message will show up after which you can disconnect your device.
- Boot your device into Stock Recovery mode.
- Select the Wipe Data/Factory Reset option for final cleaning.
- Reboot your phone into the system mode and install the Magisk Manager. Open the application and check the status, which will indicate that your Samsung Galaxy Note 20 Ultra is now rooted.
Conclusion
Congratulations, your Samsung Galaxy Note 20 Ultra is now officially rooted. Go ahead and try out various custom themes and ROMs, animations, apps to experience the magic of root.
Lastly, dropdown your views, comments, or any feedback for further assistance, and we shall see you in the next one.


