
Samsung Galaxy S20 series is one of the best Android smartphone series launched last year. The software of the series brings a ton of features and the capability to enrich the user’s experience. However, some of the features are not accessible to the consumers due to which, the topic of rooting an Android device comes up.
Today, I’ll be guiding you on how to root your Samsung Galaxy S20 series device using the Magisk method and also how to upgrade the firmware of the same.
What is Rooting

Rooting is a method that allows the users to gain complete control of their Android devices and customize it with various configurations and features that were not possible earlier without rooting.
Though officially not supported, various companies roll out customs tools and ROMs unofficially to help developers customize their Android devices and test multiple new updates, widgets, etc.
Advantages of Rooting
- Gives extensive support for multiple themes, from changing the icon looks to flashing custom boot animation intro.
- Grants the full control of the kernel program used for overclocking and underclocking the CPU and GPU.
- Bloatware removal and managing pre-installed applications.
- Rooting also enables the user’s to install custom firmware or ROMs that allows additional levels of control on a rooted device.
- Option to install the custom operating system or skins.
Disadvantages of Rooting
- The warranty of the device gets void.
- The devices that are rooted are more vulnerable to malware and hacking.
- If any step goes wrong, your device is of no use at all.
- No customer support from the brand if anything goes wrong with your device.
The Steps
A. Prerequisites
Before starting with the rooting procedure, please perform the following things on your respective devices.
On Your Computer/PC
- Samsung Android USB Driver
- SamFirm Tool
- Odin Flash Tool
- Android Verified Boot Metadata Image (Verification Disabled)
On Your Galaxy S20 Series Smartphone
B. Root Procedure
First Phase – Getting the model number and CSC code of your device
This section deals with the steps to get the model number and CSC code of your device.
- Open the “Settings” application on your smartphone.
- Go to the “About phone” tab.
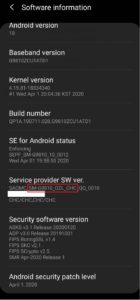
- Tap the “Software information” tab.
- See the “Service provider SW ver.” tab.
- Here, the term starting with “SM-” is the Model Number of your phone.
- After that model number, there are two three-letter code written. The second three-letter code is your CSC.
- Note the model number and the CSC. It is essential for the later phases.
Second Phase – Bootloader Unlocking
This section deals with the steps to unlock the bootloader of your device.
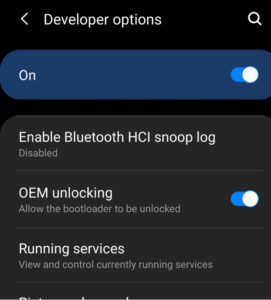
- Open the “Settings” application on your smartphone.
- Enable the developer option on your smartphone.
- Go to the developer options page.
- Enable the OEM unlocking toggle.
- If your device automatically boots to “Unlock bootloader?” mode, then enable the toggle by pressing the “Volume Up” button and shut down your phone. Skip this step if the above does not happen.
- After enabling the OEM unlocking toggle, shut down the device and hold the “Volume Up” and “Volume Down” together and connect it to your computer using a data syncing cable. (Do not use charge-only cables for this step.)
- “Unlock Bootloader?” screen will start displaying now. Proceed further and unlock the bootloader by pressing the “Volume Up” button.
- The device will now reset itself to the factory settings. Keep going further with the setup and connect to the network either through the Wi-Fi or the cellular network and keep skipping everything else.
- Repeat the first four steps to verify that “OEM Unlocking” is still on or not. If it’s on then, proceed further, or else switch it on.
- Repeat the sixth step.
- As soon as the “Warning” message screen shows, release the buttons and press the “Volume Up” button.
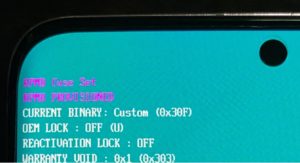
- The “Downloading” screen pops up indicating successful procedure completion. On this same screen, the top left area shows some important information.
- Check that information area for “OEM LOCK” and “REACTIVATION LOCK“. If they are turned off, then the bootloader is unlocked.
Third Phase – Disabling the Android Verified Boot Metadata Image
This section deals with the steps to disable the Android Verified Boot Metadata Image.
- Firstly, reboot your device to “DOWNLOAD” mode.
- Download and install the Odin Flash Tool and the Samsung Android USB Driver on your PC.
- Open the Odin Flash Tool application and move the “vbmeta_disabled.tar” to the USERDATA slot and click START.
- The device will now reboot but not boot into the system as the “vbmeta” signature has now been changed.
- The device reboots into the “RECOVERY” mode and a prompt “You have to reset your device to factory settings” comes up. Use the volume buttons to navigate through the options and the Power/Bixby button to select the options.
- Confirm the above and then proceed to reset the device to the factory settings.
- Now, this is the final step of clearing the data stored on your device. After this, if you do not re-lock the bootloader or re-enable the Android Verified Boot, your data won’t be lost. Also, remember that a stock firmware package always contains an Android Verified Boot Metadata Image codenamed as “vbmeta. img” with the verifications enabled. The third step will be followed here and along with that, the stock firmware will also be flashed (use BL, AP, CP, CSC slots) to make sure the Android Verified Boot is not re-enabled and the data is preserved.
Also, you can simply download the boot (kernel) tar archive from the links below for your respective device and proceed with the last step of this section directly.
- Exynos Processor Model – https://github.com/jesec/proprietary_vendor_samsung_xyzs/releases
- Snapdragon Processor Model – https://github.com/jesec/proprietary_vendor_samsung_xyzq/releases
Fourth Phase – Downloading the official firmware and upgrading to it
This section deals with the steps of downloading the official firmware and also upgrading to it.
- Open the SamFirm Tool application.
- Enter your device’s model number and CSC code which was found in the first phase section. Once entered, click on the “check update” icon and wait for the package compatible with your device to pop up.
- Click “Download” and save the ZIP file.
- After the ZIP file downloads, extract it using any of the following software: 7zip, WinRAR, or any other of your preference. Upon extracting, check for these five files namely: AP, BL, CP, CSC, and HOME_CSC. All these files are in (tar) format which can be opened by the software mentioned above.
- Verify the version code of the firmware. The last four letters indicate the version number of the firmware. Match this version number with your current firmware. If it matches, then directly skip to the next phase that is, the fifth phase. If not, then proceed with the steps below.
- Open the Odin Flash Tool application on your computer and also parallelly, reboot your smartphone to DOWNLOAD mode.
- Now, we have to verify the firmware, so, move the (AP, L, CP, CSC) files in their Odin slots. This process will take time so, do not worry.
- Next, you have to move the (HOME_CSC) file in the CSC slot.
- Move the (vbmeta_disabled) file in the USERDATA slot so that the Android Verified Boot remains disabled during the procedure and your data remains safe.
- Click the START button and wait for the setup to finish. The phone will now boot into the system to complete the upgrade process. Leave the phone untouched and let it finish without a connection error.
Fifth Phase – Extracting the boot (kernel) image from the firmware
This section deals with the steps of extracting the boot (kernel) image from the firmware. In the previous section, we downloaded the firmware and upgraded to it. If you are facing issues while creating the (tar) file, you can skip to the sixth phase but it’s a long process of flashing and can be hard to deal with the Magisk software.
- Using the extracting software, extract the (boot.img.lz4) file from the AP file.
- Again using the extracting software, create a (tar) archive which should contain the (boot.img.lz4 or tar cvf boot.tar boot.img.lz4) only.
Sixth Phase – Using the Magisk software to patch the boot (kernel) image
This section deals with the steps on patching the boot (kernel) image using the Magisk software.
- Transfer the (tar) archive you prepared in the previous phase to your smartphone. If you had skipped the previous phase, the fifth phase, then, transfer the AP file to your smartphone.
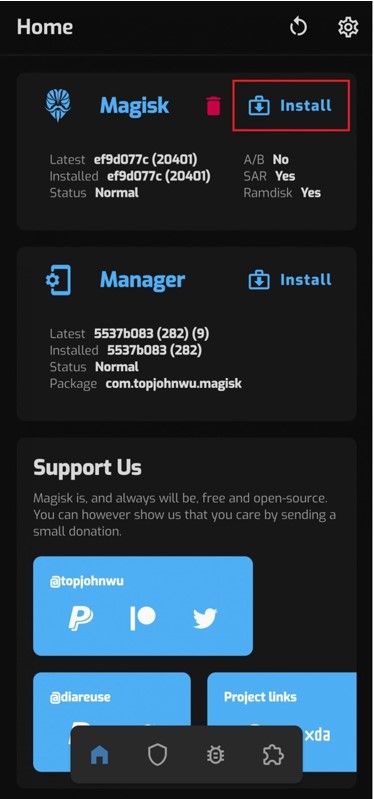
- Open the Magisk Manager application on your smartphone.
- Click the “Install” button located in the top-right area.
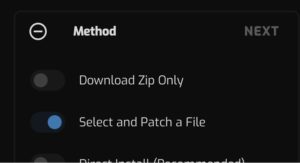
- Also, make sure the “Recovery Mode” is turned off.
- Proceed further by clicking the “Next” button. Now, select “Select and Patch a File” in the Method option.
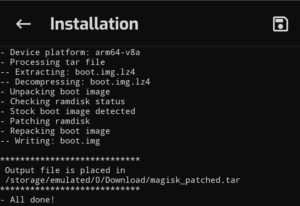
- Select the file you transferred earlier to your phone in the first step of this phase.
- Click on “Next” and “Let’s Go“.
- Now, transfer the patched file to the following directory: (Download/magisk_patched.tar) of your computer.
- Okay, so now, reboot your smartphone to the “Download” mode.
- Again open the Odin Flash tool application and put the patched file in the AP slot. Now click “Start“.
- When the reboot finishes, the Magisk is now installed on your phone and you have root access on your Samsung Galaxy S20 series.
C. Firmware Upgrade Procedure
First Phase – Downloading the official firmware and upgrading to it
This section deals with the steps of downloading the official firmware and also upgrading to it.
- Open the SamFirm Tool application.
- Enter your device’s model number and CSC code which was found in the first phase section. Once entered, click on the “check update” icon and wait for the package compatible with your device to pop up.
- Click “Download” and save the ZIP file.
- After the ZIP file downloads, extract it using any of the following software: 7zip, WinRAR, or any other of your preference. Upon extracting, check for these five files namely: AP, BL, CP, CSC, and HOME_CSC. All these files are in (tar) format which can be opened by the software mentioned above.
- Verify the version code of the firmware. The last four letters indicate the version number of the firmware. Match this version number with your current firmware. If it matches, then directly skip to the next phase that is, the fifth phase. If not, then proceed with the steps below.
- Open the Odin Flash Tool application on your computer and also parallelly, reboot your smartphone to DOWNLOAD mode.
- Now, we have to verify the firmware, so, move the (AP, L, CP, CSC) files in their Odin slots. This process will take time so, do not worry.
- Next, you have to move the (HOME_CSC) file in the CSC slot.
- Move the (vbmeta_disabled) file in the USERDATA slot so that the Android Verified Boot remains disabled during the procedure and your data remains safe.
- Click the START button and wait for the setup to finish. The phone will now boot into the system to complete the upgrade process. Leave the phone untouched and let it finish without a connection error.
Second Phase – Extracting the boot (kernel) image from the firmware
This section deals with the steps of extracting the boot (kernel) image from the firmware. In the previous section, we downloaded the firmware and upgraded to it. If you are facing issues while creating the (tar) file, you can skip to the sixth phase but it’s a long process of flashing and can be hard to deal with the Magisk software.
- Using the extracting software, extract the (boot.img.lz4) file from the AP file.
- Again using the extracting software, create a (tar) archive which should contain the (boot.img.lz4 or tar cvf boot.tar boot.img.lz4) only.
Third Phase – Using the Magisk software to patch the boot (kernel) image
This section deals with the steps on patching the boot (kernel) image using the Magisk software.
- Transfer the (tar) archive you prepared in the previous phase to your smartphone. If you had skipped the previous phase, the fifth phase, then, transfer the AP file to your smartphone.
- Open the Magisk Manager application on your smartphone.
- Click the “Install” button located in the top-right area.
- Also, make sure the “Recovery Mode” is turned off.
- Proceed further by clicking the “Next” button. Now, select “Select and Patch a File” in the Method option.
- Select the file you transferred earlier to your phone in the first step of this phase.
- Click on “Next” and “Let’s Go“.
- Now, transfer the patched file to the following directory: (Download/magisk_patched.tar) of your computer.
- Okay, so now, reboot your smartphone to the “Download” mode.
- Again open the Odin Flash tool application and put the patched file in the AP slot. Now click “Start“.
- When the reboot finishes, the Magisk is now installed on your phone and you have root access on your Samsung Galaxy S20 series.
Conclusion
To conclude things up, your device is now rooted. The root of the Samsung Galaxy S20 is done. Try installing some different skins or custom ROMs to enrich your experience. Remember, once a device is rooted, it becomes officially unsupported by the brand and, the user is held responsible for any happenings to the device.
Whenever attempting anything like this, always understand the whole procedure carefully and have sheer knowledge regarding it, or else it may lead to significant problems for your device.
Lastly, dropdown your views, comments, or any feedback for further assistance, and we shall see you in the next one.


