Android One devices come with a promise. The sole idea and purpose behind these devices are to provide the best and the latest Android experience. But a lot of times, companies turn their wheels faster to deliver to users. Such a case brewed up recently. Xiaomi Mi A3 Android update made a large number of users took to social media to report the difficulties they faced after updating their device. There was even a petition against the company, asking to either fix or replace the faulty Mi A3 devices.
What actually happened
After downloading and installing the latest OTA update on their devices, several devices turned completely dead. Multiple cases of ‘phone bricking’ came up. It is a term for a situation when a phone turns into a brick: it neither turns on nor opens the bootloader. Additionally, many Indian devices mistakenly received Mexican firmware, messing up the device big time. Some users even reported that service centres were unable to resolve the issue.
Here is what Xioami says about it
“We are aware of the issue on some Mi A3 devices following a recent Android 11 update and have since halted the rollout. We kindly request users who experience this issue to visit any of the 2,000 plus service centres across the country nearer to you where a solution will be provided for free unconditionally (within or beyond warranty). We regret the inconvenience this has brought about. As a brand committed to offering the best possible user experience, we will continuously improve our products and services,” Xiaomi said.
What is the solution
Xiaomi immediately called the update back. Users can now download a completely new Android 11 update. Let us hope that the company has fixed all the bugs with the first one. The new Android version also brings along the latest security patch. New features included in the update are message Bubbles, improved notifications, a better Do Not Disturb Mode and comprehensive device control. However, if you are someone who owns a Mi A3, wait until the company rolls out a stable update.
An important point to note here is that this is not the first time when Xiaomi smartphones struggle with Android updates. There have been multiple cases where they had to call back their Android updates, owing to multiple bugs. Devices such as Mi A2 and Mi A1 also faced a number of difficulties while receiving Android updates. Xiaomi recently launched MI 11 series in China, which might launch in Indiasoon.
Google’s Cast allows connections from both Android and iOS devices, making it a fairly open ecosystem. But, Apple’s AirPlay is quite different and does not support sharing from Android or ChromeOS devices. However, here we have brought you a way to connect to your AirPlay devices from an Android device.
Like Google’s Cast and Chromecast, Apple AirPlay allows users to seamlessly share music, photos, and movies from macOS and iOS devices to a HomePod or other Apple device. Some third-party receivers also offer AirPlay compatibility, including devices from companies like Roku and Vizio.
However, Apple officially does not offer a way for Android or ChromeOS devices to connect to AirPlay devices. To solve this, thankfully, third-party developers have created a way to share music from Android devices using AirPlay. Note that this method will work only on Android devices with version 10 and newer or a rooted phone/tablet.
How to Connect to AirPlay from an Android Device
To connect to AirPlay from your Android phone/tablet, following the given steps on your device:
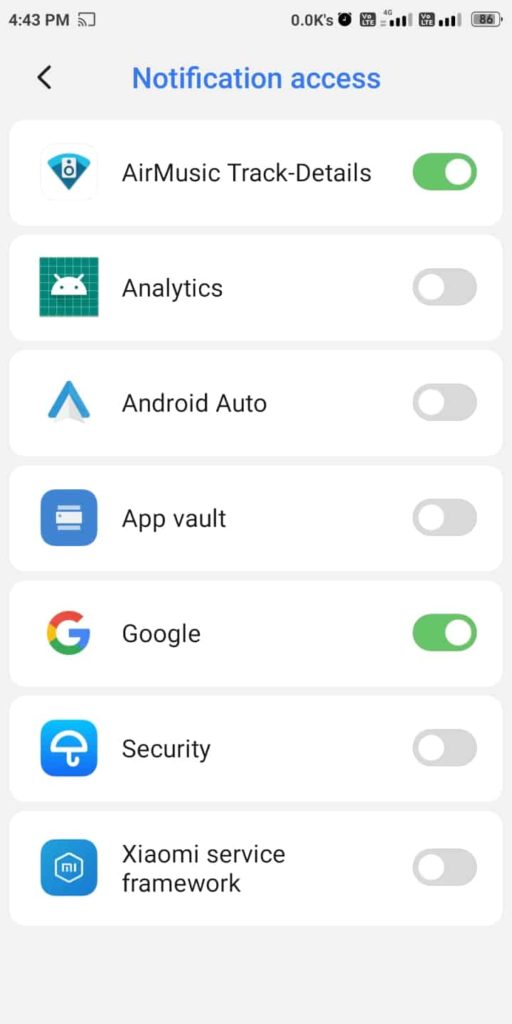
1. Install AirMusic from Playstore
First, buy and install the AirMusic app from the Google Play Store, which will cost you $4.49 (or ₹280). You can also try out the separate free trial app to know if it works before buying the full version. However, after 10 minutes, the free trial app adds extra sounds in the music you play over AirPlay from your phone.
2. Change the App Settings
In the app’s settings tab, tap the “General settings” bar, and from the expanded section, select “Native recording (experimental).” It will use the built-in audio recording abilities of your phone (with Android 10 or higher). However, if you’re using a rooted phone, you need to select the “Via Root” option.
3. Connect to an AirPlay Receiver
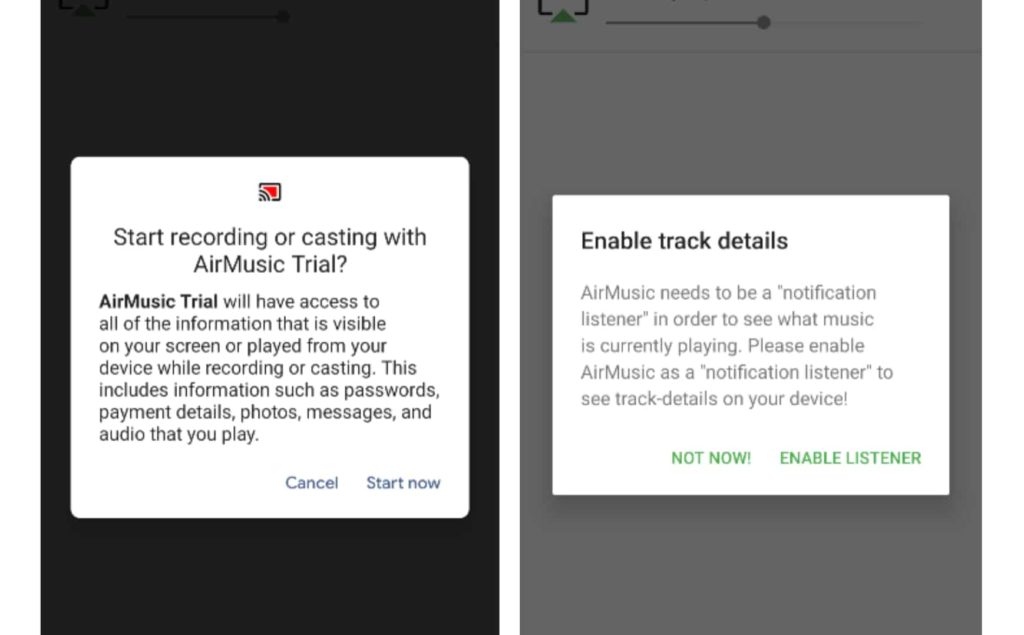
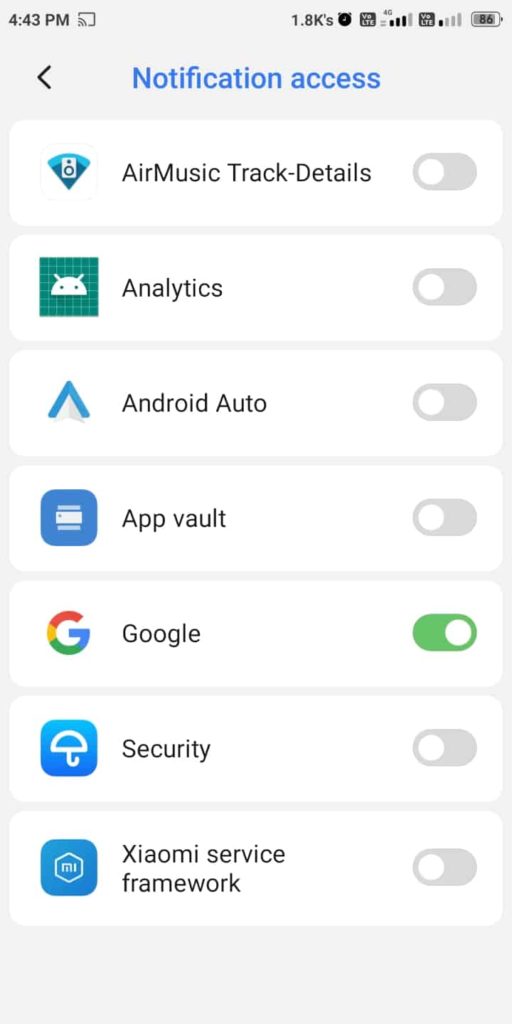
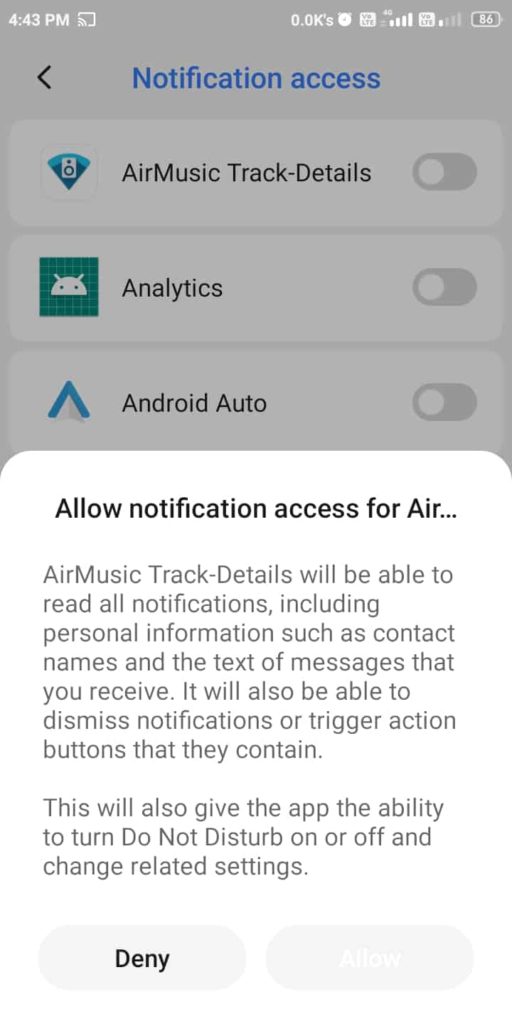
Once you tweak your settings, you’ll see a list of nearby AirMusic-supported receivers on the app’s main page. AirMusic also supports AirPlay, Fire TV, DLNA, and even Google Cast devices. From the list, tap on the AirPlay device you want to stream your music to.
Next, you’ll see a pop-up for required permissions. Just follow the next steps and provide access to your notifications (optional) after tapping the “Enable listener” button. You’ll now be connected to your AirPlay device.
4. Play Music on You Favourite App
After completing the entire setup process, open your favorite music app, and play the music you want to listen to. Note that not all music apps may not work with AirMusic, which may vary from device to device. Some say that Spotify does not play over AirPlay. However, YouTube Music works fine, but after ten minutes of use, the trial app starts adding noise to the music. If you like the trial version, you can buy the full version for $4.49 (₹280) from Play Store to seamlessly share music using AirPlay from an Android device.
Incidences of data leaks on the dark web have been very often recently. According to security researchers found sensitive data of over a hundred million debit and credit cardholders on dark web portals. Juspay, the payment platform that processes transactions for Amazon, Swiggy, MakeMyTripand other Indian as well as global merchants. The data included first and last four digits of credit and debit cards, expiry dates, and contact information of the cardholders, making them prone to phishing attacks. According to experts, this might be the biggest data leak on dark web in recent times, with over 100 million cardholders at risk.
One of the largest Finserv companies was the target
Juspay founder Vimal Kumar confirmed detection of an unauthorized attempt and data breach. However, he claimed that only customer metadata was compromised and that the sensitive information on servers was anonymized. Additionally, the data might have to do something with online transactions by users of e-commerce between March 2017 and August 2020. A Bengaluru-based startup had acknowledged compromise of its user data in the month of August. Subsequently, the hacker made several attempts to sell the data. The potential customers for this data were available on Telegram. Dark web data leak by Juspay, one of the most trusted financial companies in India is surprising.
Image Courtesy: Visa
The Juspay site has a team of around 150 people that reach millions of users on a daily basis. It has a decent claim of processing over four million daily transactions by its products. The key clients of Juspay include renowned companies like Uber, Swiggy, Vi (Vodafone Idea), Flipkart, Amazon and Airtel. This narrows down to over a hundred million devices that can avail the system development kits (SDKs) of Juspay.
As the digital infrastructure of our country is expanding, data leaks on the dark web are becoming more frequent in India. This calls for a better and safer system to ensure the safety of the user data. As per the Payment Card Industry Data Security Standard (PCI DSS), Juspay holds the highest level of compliance. However, they were not able to contain the breach. It is high time the privacy protection law gets rigid enough to put a stop to this.
OnePlus is about to bring the latest Oxygen 11 OS to its phones. In a community postdated 2nd January, the company announced the arrival of Oxygen 11 OS to OnePlus devices. The first to receive this huge update would be the OnePlusNord. The device also received a mini updatelast week. The update would roll out early next week. It is a part of the open beta testing that companies do in order to collect feedback from the user. However, it might take some time to fine-tune the same into a stable version.
Oxygen OS 11 was limited to OnePlus 8 series
Until now, Oxygen OS 11 was only available with the latestOnePlus 8 lineup. OnePlus 8, 8T and 8 Pro come pre-installed with the latest operating system right out of the box. Earlier this year, OnePlus attemptedto roll out the latest Oxygen OS to their 7 series’ smartphones. But they faced a data encryption issue and are currently working on a closed-beta in coordination with Qualcomm. They might launch an open beta soon after the update runs stable on Nord.
Image Courtesy: Android Police
Although there is no clear word as to when – OnePlus 6 and 6T would also receive the latest operating system. When released, the former came with Android 8.1, with a promise of two major OS updates by OnePlus. Good to see that the company is rolling out Oxygen 11 OS update for these devices. The time period from the day of purchase of a device to its decline is very crucial for a brand’s image. The top companies in the industry stay relevant and provide their customers with the best possible solutions.
Based on Android 11, it focused on a seamless user experience and better data security. As we all know, Oxygen OS offers one of the cleanest and customizable user-interface. After Google and Samsung, OnePlus devices could take benefit of Android 11. OnePlus is also about to launch two new budget smartphonesin the Indian market.
Take your Oppo smartphone in hand and turn it off. Long press the power button and you’ll see Oppo’s logo on the screen. That’s known as a splash screen or boot logo. Perhaps not everyone likes it. Some may even want to change it. The question, can you change the splash screen on an Oppo smartphone? Fortunately, the answer is yes.
We at AndroidFist have curated a list of methods with step-by-step instructions on how to change the splash screen on Oppo devices. These methods are tried and tested but may not work on some units due to millions of reasons. Thus, we don’t take any responsibility if your phone bricks or the software crashes or gets corrupted and so on. Thus, user discretion is advisable.
Disclaimer: Most of these methods require a rooted Oppo device that grants the user access to the various Android subsystems for greater control allowing users to perform functions that otherwise wouldn’t be possible with a non-rooted Android operating system. Also, we don’t take responsibility if your phone bricks or turns into the next Dragon Capsule to Mars so proceed at your own risk.
How To Create a Splash Screen (Boot Logo)
Before you can proceed with changing a splash screen on your Oppo Smartphone, you need to make sure you have a custom splash screen ready at your disposal. Apparently, there are plenty of methods you can do to create a splash screen. Here’s one of the methods that you can use.
Things To Keep In Mind
Before you can proceed, there are a few things you should be aware of. First up, you need to find out the screen resolution of your device. It is just a piece of cake since you can literally find it on GSMArena. For example, your phone could have a resolution such as 720×1440 or 1080×1920. Once you have it, you need to check the buffer size of the splash screen that the system allocates to your device. Some devices could have it at 75KB or 100KB or more or less. Note that anything above the buffer size, the system will remove it and replace it with the original one. Using fewer colors reduces the size, and compressing it using compressPNG or other tools helps too.
Here’s how you can create a splash screen (boot logo) on Oppo smartphones
Step 01: The first and the most important thing you’ll need is a splash maker. You can refer to this splash toolcreated by a member of XDA Developer. Note that you need to check the screen resolution that we mentioned above before proceeding.
Once you download the said tool, extract it using a ZIP extractor and check out the bin folder for a file titled “Technical Details”. You will find information about the screen size the tool can create splash screens for.
If it is not as per your phone’s screen size, here are some tools with varying output resolutions to try – 1, 2, 3, 4
Step 02: You need to create a splash (boot logo) that suits you. Remember to keep it aptly under the screen resolution and buffer size.
Step 03: Name the new file as “logo.jpg”, “logo.png”, depending upon what your device has its original boot logo file saved as. It could also be “splash.img” or “splash.png”, so make sure you take a note of the original name first for the nomenclature.
Step 04: Open the downloaded files, go to the ‘Pics’ subfolder and replace the old boot logo with the new one. Take a backup of the original file in case if needed in the later run.
Step 05: Finally, navigate to the main folder and run the Batch File called “CREATE_LOGO.bat”. This sound encodes the new splash screen in the file that you will have to flash it using Method #3 or Method #4, whichever suits you well.
Step 06: You will find the final boot logo (image) in the “Output” folder.
You can also trythis toolor any other toolto create a splash screen for your device.
How To Change Splash Screen (Boot Logo) For Oppo Smartphones
Comparatively difficult to perform and a bit lengthy, this method does its magic if done right. Here’s how you can do it.
Method #4: Flashing Splash Screen (Boot Logo) Using Terminal Emulator
We are assuming that you already have a boot logo or splash screen ready to flash using a Terminal Emulator. Here, you don’t need a PC but rather a rooted Oppo smartphone to carry out this function.
Step #1: The very first thing you should do is to download theTerminal Emulator from the Google Play Store.
Step #2: Install the app and launch it.
Step #3: Next up, you need to move the new splash screen to the internal storage of your device.
Step #4: You need to enter this command on your device that will flash the newly created splash screen on your Oppo smartphone.
Here, the assumptions are that the file you created is named as “splash.img”, but you can alter the code based on the file name saved. This method should work pretty flawlessly although we don’t take any responsibility in case it backfires. There you have it. Hope these methods work for you but user discretion is advised.
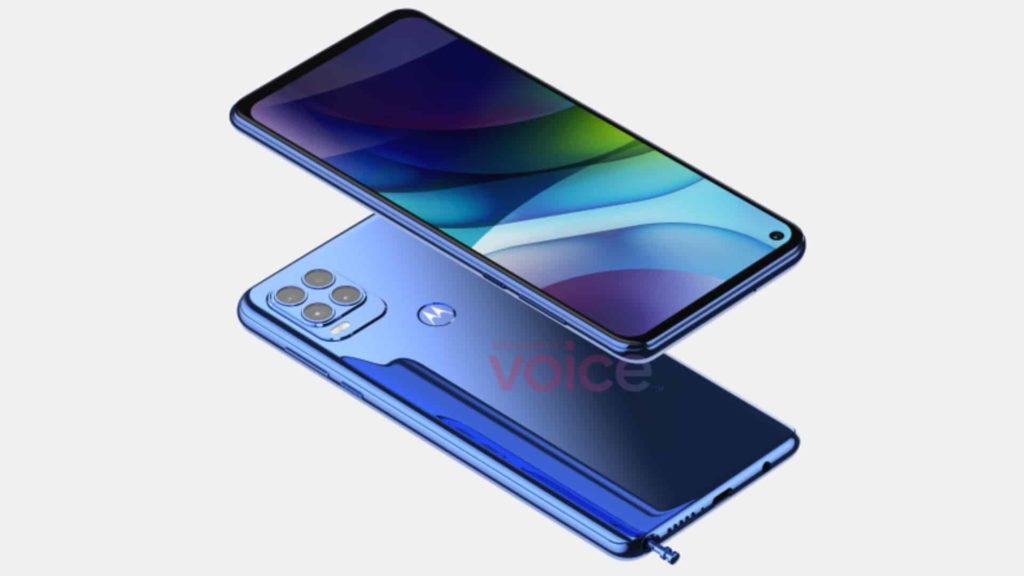
Motorola’s Moto G sequel has appeared in this year’s first leak with design renders. It seems like the company is working on a supersized model of the Moto G Stylus — the Moto G Stylus 2021 — as a new leak reveals design renders of the upcoming phone. Last year, Motorola released two Moto G phones, the G Power and G Stylus, in the US and some other regions. The Moto G Stylus carried a passive stylus to compete against the LG Stylo series. But now, Motorola seems to bring a super-sized sequel for this.
Image courtesy: OnLeaks | Voice
According to the latest renders shared by OnLeaks, the 2021 version of the Moto G Stylus will have a massive flat 6.8-inch display. The leak reveals the handset will be about 169.6mm tall and 73.7mm wide. It will carry a depth of about 8.8mm without the camera bump and 10.9 mm while including the camera bump. If this leak is accurate, the upcoming Moto G Stylus 2021 will be even larger than the Galaxy Note20 Ultra.
Moto G Stylus 2021 Expected Features
As per the report, the 2021 Moto G Stylus will feature a single hole-punch camera mounted at the front, on the large screen. On the back, the phone will carry a quad-camera setup with a 48MP main camera, 8MP ultra-wide lens, 5MP macro lens, and a 2MP depth sensor. Also, there will be a rear or side-mounted fingerprint sensor. Further, the namesake stylus will lie at the bottom. However, it is expected that the stylus will continue to be passive and not an active pen, like the one found in Samsung’s Note series devices.
Image courtesy: OnLeaks | Voice
Image courtesy: OnLeaks | Voice
To recall, Motorola recently announced its plan to roll out the Android 11 update for 23 phones. And Moto G Stylus is one of them. This indicates that its sequel will also run the latest Android OS, the Android 11, under the hood. Currently, we don’t have more details about the upcoming phone, but, a leak from Nils Ahtensmeier does reveal the model number and its code name. However, this phone appears in a black color with model number XT2115-1 for the US, and the company is reportedly developing it under the codename ‘Minsk.’
Image courtesy: Nils AhrDE | Voice
Note that it’s not yet clear when the company will officially reveal its new phone. But we expect to hear more about this handset in the coming weeks. If you don’t know, Motorola had revealed the original models in February 2020.
When it comes to providing the latest security and software updates, Samsung has been doing a decent job lately. While the Korean manufacturer was very lethargic in rolling out updates, a couple of mid-rangers received an OTA update from Samsung even before they could make set a foot in the market. As the title of this article says – ‘Samsung Brings Android 11 to Galaxy devices’, we will be discussing devices that currently run on Android 11.
Android 11 made its way to Samsung devices earlier last month, in the form on OneUI 3.0 (Samsung’s OS). The latest version of Google’s operating system includes subtle yet crucial improvements. For instance, new and refined ways to interact with notification. You can now reply to a WhatsApp or Instagram tile directly from the notification bar. The bubble messaging helps in accessing messages right from the home screen.
Image Courtesy: NDTV Gadgets 360
Samsung Brings Android 11 to These Galaxy Devices
Galaxy S20 series
Samsung’s most powerful flagships, the S20 seriesgot hands-on Android 11 on December 2. The update rolled out on both US and international models.
Galaxy S20 FE
The S20 FE got the latest OneUI 3.0 on December 18 for major markets like US, UK, Germany and India.
Galaxy Note 20 series
The elder brother from the same line-up, Note 20 received the update on December 14.
Galaxy Z Flip and Flip 5G
Samsung used to be very slow when it comes to bringing foldable devices on its latest operating system. However, Galaxy Z Flip 5Gbroke that trend, as it got the latest Android update. For some reason, only the devices in Switzerland can access this update. Indian users can download a 2GB update for their Galaxy Z Flip.
Galaxy S10 Lite
A little surprising, as the Galaxy S10 was one of the most popular smartphone series on the planet. Samsung has yet not released Android 11 for the S10 devices out there. Out of the 3 phones, S10 Lite picked up the latest OS in Spain and India.
I recently upgraded to a Samsung device – Galaxy M51. Just when I was setting up the device, I received 2 OTA updates. They were focussed on performance, camera improvements, with the addition of Samsung’s Secure Folder feature. The security patch was updated to November 2020, which is analogous to what the current flagships run on. However, the OneUI 3.0, based on Android 11 is not yet available on my device.
Samsung Galaxy S20 series is one of the best Android smartphone series launched last year. The software of the series brings a ton of features and the capability to enrich the user’s experience. However, some of the features are not accessible to the consumers due to which, the topic of rooting an Android device comes up.
Today, I’ll be guiding you on how to root your Samsung Galaxy S20 series device using the Magisk method and also how to upgrade the firmware of the same.
What is Rooting
Rooting is a method that allows the users to gain complete control of their Android devices and customize it with various configurations and features that were not possible earlier without rooting.
Though officially not supported, various companies roll out customs tools and ROMs unofficially to help developers customize their Android devices and test multiple new updates, widgets, etc.
Advantages of Rooting
Gives extensive support for multiple themes, from changing the icon looks to flashing custom boot animation intro.
Grants the full control of the kernel program used for overclocking and underclocking the CPU and GPU.
Bloatware removal and managing pre-installed applications.
Rooting also enables the user’s to install custom firmware or ROMs that allows additional levels of control on a rooted device.
Option to install the custom operating system or skins.
Disadvantages of Rooting
The warranty of the device gets void.
The devices that are rooted are more vulnerable to malware and hacking.
If any step goes wrong, your device is of no use at all.
No customer support from the brand if anything goes wrong with your device.
The Steps
A. Prerequisites
Before starting with the rooting procedure, please perform the following things on your respective devices.
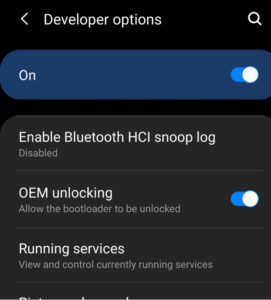
If your device automatically boots to “Unlock bootloader?” mode, then enable the toggle by pressing the “Volume Up” button and shut down your phone. Skip this step if the above does not happen.
After enabling the OEM unlocking toggle, shut down the device and hold the “Volume Up” and “Volume Down” together and connect it to your computer using a data syncing cable. (Do not use charge-only cables for this step.)
“Unlock Bootloader?” screen will start displaying now. Proceed further and unlock the bootloader by pressing the “Volume Up” button.
The device will now reset itself to the factory settings. Keep going further with the setup and connect to the network either through the Wi-Fi or the cellular network and keep skipping everything else.
Repeat the first four steps to verify that “OEM Unlocking” is still on or not. If it’s on then, proceed further, or else switch it on.
Repeat the sixth step.
As soon as the “Warning” message screen shows, release the buttons and press the “Volume Up” button.
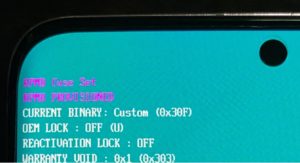
The “Downloading” screen pops up indicating successful procedure completion. On this same screen, the top left area shows some important information.
Check that information area for “OEM LOCK” and “REACTIVATION LOCK“. If they are turned off, then the bootloader is unlocked.
Third Phase – Disabling the Android Verified Boot Metadata Image
This section deals with the steps to disable the Android Verified Boot Metadata Image.
Firstly, reboot your device to “DOWNLOAD” mode.
Download and install the Odin Flash Tool and the Samsung Android USB Driver on your PC.
Open the Odin Flash Tool application and move the “vbmeta_disabled.tar” to the USERDATA slot and click START.
The device will now reboot but not boot into the system as the “vbmeta” signature has now been changed.
The device reboots into the “RECOVERY” mode and a prompt “You have to reset your device to factory settings” comes up. Use the volume buttons to navigate through the options and the Power/Bixby button to select the options.
Confirm the above and then proceed to reset the device to the factory settings.
Now, this is the final step of clearing the data stored on your device. After this, if you do not re-lock the bootloader or re-enable the Android Verified Boot, your data won’t be lost. Also, remember that a stock firmware package always contains an Android Verified Boot Metadata Image codenamed as “vbmeta. img” with the verifications enabled. The third step will be followed here and along with that, the stock firmware will also be flashed (use BL, AP, CP, CSC slots) to make sure the Android Verified Boot is not re-enabled and the data is preserved.
Also, you can simply download the boot (kernel) tar archive from the links below for your respective device and proceed with the last step of this section directly.
Fourth Phase – Downloading the official firmware and upgrading to it
This section deals with the steps of downloading the official firmware and also upgrading to it.
Open the SamFirm Tool application.
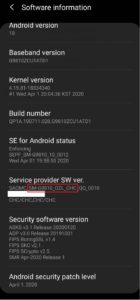
Enter your device’s model number and CSC code which was found in the first phase section. Once entered, click on the “check update” icon and wait for the package compatible with your device to pop up.
Click “Download” and save the ZIP file.
After the ZIP file downloads, extract it using any of the following software: 7zip, WinRAR, or any other of your preference. Upon extracting, check for these five files namely: AP, BL, CP, CSC, and HOME_CSC. All these files are in (tar) format which can be opened by the software mentioned above.
Verify the version code of the firmware. The last four letters indicate the version number of the firmware. Match this version number with your current firmware. If it matches, then directly skip to the next phase that is, the fifth phase. If not, then proceed with the steps below.
Open the Odin Flash Tool application on your computer and also parallelly, reboot your smartphone to DOWNLOAD mode.
Now, we have to verify the firmware, so, move the (AP, L, CP, CSC) files in their Odin slots. This process will take time so, do not worry.
Next, you have to move the (HOME_CSC) file in the CSC slot.
Move the (vbmeta_disabled) file in the USERDATA slot so that the Android Verified Boot remains disabled during the procedure and your data remains safe.
Click the START button and wait for the setup to finish. The phone will now boot into the system to complete the upgrade process. Leave the phone untouched and let it finish without a connection error.
Fifth Phase – Extracting the boot (kernel) image from the firmware
This section deals with the steps of extracting the boot (kernel) image from the firmware. In the previous section, we downloaded the firmware and upgraded to it. If you are facing issues while creating the (tar) file, you can skip to the sixth phase but it’s a long process of flashing and can be hard to deal with the Magisk software.
Using the extracting software, extract the (boot.img.lz4) file from the AP file.
Again using the extracting software, create a (tar) archive which should contain the (boot.img.lz4 or tar cvf boot.tar boot.img.lz4) only.
Sixth Phase – Using the Magisk software to patch the boot (kernel) image
This section deals with the steps on patching the boot (kernel) image using the Magisk software.
Transfer the (tar) archive you prepared in the previous phase to your smartphone. If you had skipped the previous phase, the fifth phase, then, transfer the AP file to your smartphone.
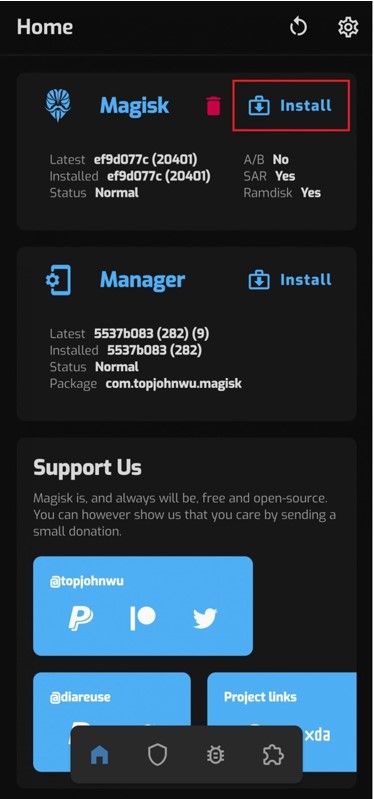
Open the Magisk Manager application on your smartphone.
Click the “Install” button located in the top-right area.
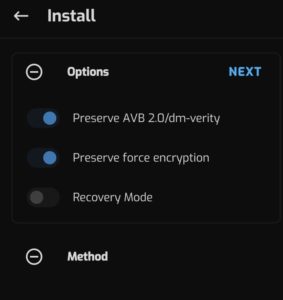
Also, make sure the “Recovery Mode” is turned off.
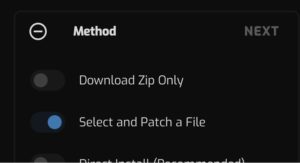
Proceed further by clicking the “Next” button. Now, select “Select and Patch a File” in the Method option.
Select the file you transferred earlier to your phone in the first step of this phase.
Click on “Next” and “Let’s Go“.
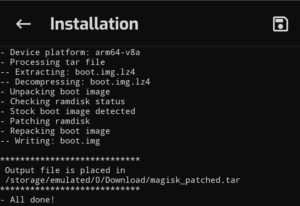
Now, transfer the patched file to the following directory: (Download/magisk_patched.tar) of your computer.
Okay, so now, reboot your smartphone to the “Download” mode.
Again open the Odin Flash tool application and put the patched file in the AP slot. Now click “Start“.
When the reboot finishes, the Magisk is now installed on your phone and you have root access on your Samsung Galaxy S20 series.
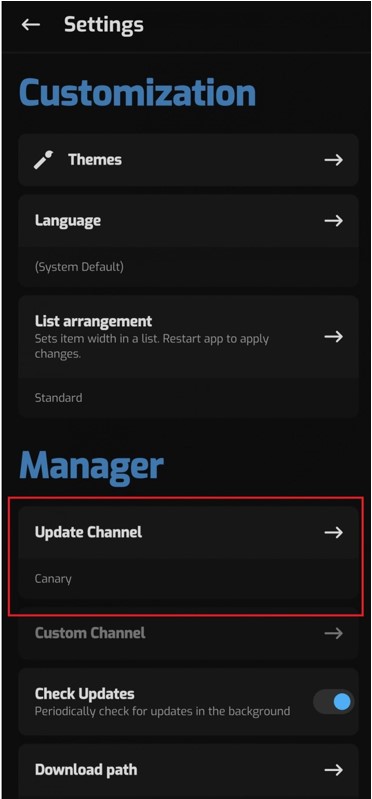
C. Firmware Upgrade Procedure
First Phase – Downloading the official firmware and upgrading to it
This section deals with the steps of downloading the official firmware and also upgrading to it.
Open the SamFirm Tool application.
Enter your device’s model number and CSC code which was found in the first phase section. Once entered, click on the “check update” icon and wait for the package compatible with your device to pop up.
Click “Download” and save the ZIP file.
After the ZIP file downloads, extract it using any of the following software: 7zip, WinRAR, or any other of your preference. Upon extracting, check for these five files namely: AP, BL, CP, CSC, and HOME_CSC. All these files are in (tar) format which can be opened by the software mentioned above.
Verify the version code of the firmware. The last four letters indicate the version number of the firmware. Match this version number with your current firmware. If it matches, then directly skip to the next phase that is, the fifth phase. If not, then proceed with the steps below.
Open the Odin Flash Tool application on your computer and also parallelly, reboot your smartphone to DOWNLOAD mode.
Now, we have to verify the firmware, so, move the (AP, L, CP, CSC) files in their Odin slots. This process will take time so, do not worry.
Next, you have to move the (HOME_CSC) file in the CSC slot.
Move the (vbmeta_disabled) file in the USERDATA slot so that the Android Verified Boot remains disabled during the procedure and your data remains safe.
Click the START button and wait for the setup to finish. The phone will now boot into the system to complete the upgrade process. Leave the phone untouched and let it finish without a connection error.
Second Phase – Extracting the boot (kernel) image from the firmware
This section deals with the steps of extracting the boot (kernel) image from the firmware. In the previous section, we downloaded the firmware and upgraded to it. If you are facing issues while creating the (tar) file, you can skip to the sixth phase but it’s a long process of flashing and can be hard to deal with the Magisk software.
Using the extracting software, extract the (boot.img.lz4) file from the AP file.
Again using the extracting software, create a (tar) archive which should contain the (boot.img.lz4 or tar cvf boot.tar boot.img.lz4) only.
Third Phase – Using the Magisk software to patch the boot (kernel) image
This section deals with the steps on patching the boot (kernel) image using the Magisk software.
Transfer the (tar) archive you prepared in the previous phase to your smartphone. If you had skipped the previous phase, the fifth phase, then, transfer the AP file to your smartphone.
Open the Magisk Manager application on your smartphone.
Click the “Install” button located in the top-right area.
Also, make sure the “Recovery Mode” is turned off.
Proceed further by clicking the “Next” button. Now, select “Select and Patch a File” in the Method option.
Select the file you transferred earlier to your phone in the first step of this phase.
Click on “Next” and “Let’s Go“.
Now, transfer the patched file to the following directory: (Download/magisk_patched.tar) of your computer.
Okay, so now, reboot your smartphone to the “Download” mode.
Again open the Odin Flash tool application and put the patched file in the AP slot. Now click “Start“.
When the reboot finishes, the Magisk is now installed on your phone and you have root access on your Samsung Galaxy S20 series.
Conclusion
To conclude things up, your device is now rooted. The root of the Samsung Galaxy S20 is done. Try installing some different skins or custom ROMs to enrich your experience. Remember, once a device is rooted, it becomes officially unsupported by the brand and, the user is held responsible for any happenings to the device.
Whenever attempting anything like this, always understand the whole procedure carefully and have sheer knowledge regarding it, or else it may lead to significant problems for your device. Lastly, dropdown your views, comments, or any feedback for further assistance, and we shall see you in the next one.
If you are someone who plays action video games, a grappling hook comes in real handy. In my experience, it helps in climbing buildings, hooking the enemy, or even picking up a nearby object. It is one of the most common tools in superhero movies as well. You must have seen Tom Cruiseusing it in the Mission Impossible titles, or the most common example – Batman. As it turns out, a South African tech enthusiast has made and tested a working grappling gun. Hooked yet?
JT, who previously worked as an intern with the famous YouTube channel Hacksmith Industries, has made a real-life grappling hook. Firstly, it a single unit that attaches to his arm via straps. The gun shoots hooks through a CO2 blaster. Secondly, it has a 10,000W motor, that can easily lift his body weight, and actually ascend in height, and drop him back to the ground. In a video made by JT on his YouTube channel Built IRL, he rightly differentiates his attempt with others in the past.
We are talking about a fully functioning grappling gun that can take a person’s weight. That is exciting in itself. Also, in the video, we get to know some real-life problems in making a grappling gun, which obviously did not trouble batman.
Image Courtesy: Built IRL
While using the grappling hook, the hand controlling the device is the hand on which JT’s boy weight rests. Using a harness to equally distribute the weight throughout his body is a smart solution. Additionally, hooking up to anything is not as easy as it is in games or movies. From what it appears, the CO2 tank needs to be replaced after every shot.
Even after all these downsides, it is amazing how JT has manages such functionality in a rather compact looking device. To add to the hype he created from his invention, he is also working on a real-life web shooter, which works on similar mechanics.
Which brand comes into your mind when you think about fitness bands or smartwatches? You might think of Fitbit or Xiaomi. Both of them manufacture good quality fitness trackers and have a stronghold in the market. Also, over the past couple of years, the demand for fitness trackers have significantly increased. Hence, more companies are diversifying their product portfolio; entering into the smartwatch manufacturing business. The latest entry to this list would be OnePlus!
From making budget flagships to expanding over audio products, OnePlus knows how to deliver value to their customers. Previously, OnePlus confirmed about launching a smartwatch in early 2021. According to a report, OnePlus is about to launch an affordable fitness band soon, in late January or early February. It makes sense that the fitness tracker will arrive before the OnePlus 9 series.
OnePlus Fitness Band could have these features
The OnePlus Fitness Band would compete straight with the Mi Band 5, an excellent fitness tracker in its price point. The expected specification would also mirror the competition, including an AMOLED display, multi-day battery life and water resistance. Although there is no official word on the features. In my observation, the band would definitely have a heart rate sensor, decent battery life and some OnePlus exclusive functionality. Samsung Galaxy Fit 2could see price drops, to avoid sales dip due to the OnePlus Band.
If OnePlus provides a blood-oxygen monitor, it would immediately place itself ahead of the competition. With some previous products, OnePlus first launched locally and then targeted the international market. The global availability of this fitness tracker might be delayed.
Over the past years, OnePlus has grown as a brand. They recently shook of the ‘Flagship Killer’ tag from their shoulders. Making a re-entry in the budget smartphone market with Nord and the recent N10 speaks a lot. It is clear that they are striving to dominate the smartphone industry, specifically in the Indian market.


")