The pandemic compelled us to work from home. In a way, it is essentially working on the internet. And in this process, video calls and video conferencing applications are playing an integral part. While all of us are using these applications, there are some factors that effect the user experience. It is to enhance this experience that Google Meet has come up with a new ‘Troubleshooting and Help’ menu in the overflow button at the bottom right of the app interface. Using the Google Meet Troubleshooting Menu, one can easily monitor the factors that determine the call quality.
When you click on the menu, a new window will open, with the meeting ID at the top. The first metric available under the Google Meet Troubleshooting Menu is ‘Network Stability’. You can browse this section to track the ‘Connection Delay’ or ‘lag’ in simple words. More than often, video calls and conferencing is not instantaneous, due to poor internet connectivity. Using this new feature, you can monitor the delay time and switch to a different and better connection.
Google Meet Troubleshooting – System Load
The second metric that you can observe is ‘System Load’. Video calls and conferencing with multiple people use a lot of internet and processing power. Hence, it might be slightly heavy for your CPU. You might also be using some other software in your laptop or desktop at the same time. The system load tool shows you the real-time CPU usage in percentage. You can refer to it and do tasks accordingly.
At the bottom of this menu, you would also find a ‘more troubleshooting tips’ button. It leads you to a Google support blogwherein various difficulties related to Google Meet are addresses.
With the truly wireless earphones, Coolpad is debuting in the accessories market. Interestingly, there are so many options in this price segment, which make it really hard for the end-user to make their decision. However, the Coolpad Cool Bass Buds might make your decision easy. They are available on Amazon, at an aggressive price tag of ₹1,199.
With a 13mm driver and a digital battery indicator, the Coolpad Cool Bass Buds happen to have some nerve. Running on Bluetooth 5.0, Coolpad Cool Bass Buds can deliver 3 hours of playtime in just 15 minutes of charging. Thanks to the Quick Charge feature. You would be able to interact with your smartphone, using the Google Assistant and Siri voice assistant on these earbuds.
The Coolpad Cool Bass Buds come with an LED battery indicator
The digital battery indicator happens to be the USP of this device. As soon as you open the lid of the charging case, you see a small digital display. Now, this is a slightly better approach to reflect on the battery percentage. As a standard trend, other wireless earbuds come with an LED indicator. They glow in red, orange, and green, which is not an accurate apprehension of the battery left.
Listen to your favourite music for up to 4 hours
A 40mAh battery lasts around 3 to 4 hours of realistic usage. However, the company claims the battery life to be 4.5 hours. According to the company, the charging case has a capacity of 400mAh. While this should charge the multiple times, it only claims to offer 20 hours of play time. Other than that, the earbuds can pair instantly with your smartphone. You can also pair them manually by pressing the tactile button for 2 seconds. Playing or pausing your favourite music is just one click away, with the Coolpad Cool Bass Buds.
Image Courtesy: Amazon
Type-C port at this price is really good!
The Coolpad Cool Bass Buds come with a USB Type-C port for charging. It simply means that you can use one single charger for charging your smartphone and your earbuds. No need to carry extra cables. While I am sceptical about the sound quality on this one, it would surely have an enhanced bass, owing to the 13mm dynamic driver.
Image Courtesy: Amazon
The Coolpad Cool Bass Buds are available in two colours – Blue and Black. So if you are someone who wants to enjoy a truly wireless experience at the lowest budget, this product is made for you. Still, if you want to invest more in a truly wireless earphone, Oneplus Budsmight be a good option.
Screenshots are one of the basic functions we use in our daily life. Whether we are messaging or reading an article, screenshots are pretty useful in clipping out important information for future references or sharing. Seeing how screenshots are used by various consumers, scrolling screenshots in android is one such feature brands have added to their custom skins or OS.
As the name says, scrolling screenshot helps take long screenshots of the content on your smartphone’s screen such, as a messaging app or an article. Even though this feature has been a part of the skin or OS for many brands, some smartphones don’t have native support for scrolling screenshots which, is a surprise considering how easily it can be implemented on Android. So today, I’ll be guiding you on how to get the scrolling screenshot on your Android smartphone.
The Custom App For Scrolling Screenshots
As you just read the heading, it says, ‘A Custom App’ which, totally makes sense. If your smartphone does not support the scrolling screenshot feature, then there’s absolutely no way that you can get it enabled through the settings panel. You will have to download a third-party application from the Google Play Store to get this feature.
There are many applications you can find in the Play Store that are quite popular among the users. Here are some of our recommendations:
1. Screen Master: Scrolling Screenshots and Filters (PAID)
Pros
Support for (.PNG) format.
Direct save to SD card support.
Multiple methods and gestures to take screenshots.
Support for filter and editing with stickers, text, and much more.
Orientation support for custom resolutions.
Highest rated application in Play Store.
Cons
Too many pop-ups for a single screenshot.
Sometimes get buggy in various applications due to resolution issues.
Go ahead and try these apps on your device and comment down which one do you like the most. Lastly, dropdown your views, comments, or any feedback for further assistance, and we shall see you in the next one.
Currently, it is an era of smartphones with big batteries and fast charging speeds. With the hardware technology advancing so fast every day, it’s hard for the included battery to keep up with it, so today, I’ll be guiding you on the steps you should follow to increase your battery life on your Android smartphone.
Tips To Increase Battery Life
Enable Battery Saver Mode To Increase Battery Life
The first step in the process of increasing battery life on your Android smartphone is by enabling the in-built battery saver mode.
The battery saver mode is pre-optimized by the phone’s brand which, lowers the screen brightness, disables the background synchronization of the most used applications, and much more. It also lowers the performance of your devices such as the refresh rate, running applications, etc.
Manual Brightness Level Adjustment To Increase Battery Life
We all adjust the brightness of our phone’s screen irrespective of the auto-brightness settings being enabled. Due to this, the phone’s auto-brightness sensor, or the light sensor, is always on, which affects the battery life of your device whenever the screen turns on. Try using the manual slider for adjusting the brightness of your device as it remains the same till change, so, it makes the light sensor inactive, thus saving a bit of battery life of your device.
Disable Display Turn On For Notification Prompt
One of the most battery-consuming things is the display and, the more it turns on, the more it consumes. Apart from using the device, the screen also, by default, turns on when a notification arrives, which consumes a lot of battery as we receive tons of notification prompts throughout the day. Try limiting the notification prompt settings to either sound tone or the notification light if your device supports it. It will prevent the screen from turning on again every time a notification arrives, thus saving your device’s battery.
Features And Settings Not In Use
Wi-Fi, GPS, NFC, Bluetooth are settings and features that most of us use every day. As our device depends on settings like these, we tend to leave them on even when we are not using them that, in the background, consumes a lot of battery. I understand that turning them on every time you use your phone can be a headache, but for the concern of your battery life, when you finish using these settings, just switch them off as they are one of the most important reasons for low battery life.
Battery/Screen Usage Info
All of these ways of increasing the battery life of your smartphone make sense if you monitor your battery usage. The built-in battery or screen usage information in the settings page provides a detailed look at how exactly your battery is being consumed. It shows which application you use the most, or which application draws more battery in the foreground and the background state of the device, and much more. A graphical approach also displays the charging cycle of your device which, also provides the battery capacity remaining to its original state.
Charging Frequency
This part can be a personal choice for many people as some say that do not charge your phone daily or charge your phone daily, etc. To understand what’s the best practice of charging your device, you should be knowing your usage pattern. For those who are more of a casual user, charging your phone once in two days can be a great way of maintaining the device’s battery life. Also, don’t use your device for the graphics-intensive task while it’s charging as it degrades the battery life.
Dark Wallpaper
Wallpapers don’t have much big impact on battery life if you are using a static wallpaper. Using live wallpapers or animated wallpapers decreases the battery life of your device as it requires a constant refresh throughout the time your device is switched on. Try using a static wallpaper as it remains intact and does not require a constant refresh which saves a lot of battery life. If your phone has an OLED display panel, then you can try any dark theme based wallpapers as it not only makes your phone look much more subtle to your eyes but also increases the battery life.
Conclusion
Do try these tips on your Android smartphone to increase battery life and also enhance your user experience with it. Lastly, dropdown your views, comments, or any feedback for further assistance, and we shall see you in the next one.
It is not the first time when data from WhatsApp is available on search engines. Yet again, WhatsApp groups are showing up on Google. WhatsApp enabled indexing of group chat invites. As a consequence, anyone could get a WhatsApp group join link by simply searching on the internet. Someone who finds a link can not only join a group but also see the participants, their profile photos, contact details and even the texts and posts shared on the group. Researched at Gadgets360have verified the news.
WhatsApp Group Join Links are not the only issue!
Another old issue that seems to be resurfacing is the display of WhatsApp profiles in search results. Just like the issue mentioned above, a user’s contact details, profile picture and other information can be accessed on Google. Both these issues emerged in 2019. WhatsApp even addressed the issues saying “Since March 2020, WhatsApp has included the ‘no-index’ tag on all deep link pages which, according to Google, will exclude them from indexing.“
Image Courtesy: The Independent
However, according to experts, adding the no-index is not a solution. As soon as a no-index tag is added to a link, it is immediately removed from Google listings. But, they happen to reappear in a few months. This is also a direct hit on users privacy. We have to understand, that a simple Google search can either fetch contact details of a user or the WhatsApp group join links. By this time, around 1,500 groups invite links, and 5,000 user profiles have already appeared in the search results.
In 2021, WhatsApp has changed its privacy policy, leaving users with no option but to comply with their data being shared with Facebook. In my opinion, such frequent integral breakdowns and repetition of the same concerns are not for a company’s image. Nevertheless, they are also coming up with some useful updates.
The Xiaomi Mi 11 is the first flagship smartphone of the year. Featuring the most powerful Snapdragon chipset yet, the device appears to be really promising. However, since the launch, forums and tech communities are flooded with feedbacks and unnoticed issues. A very recent report says that the phone produces a weird noise while playing music on it. Yes, that sounds strange!
According to Xiaomi, Mi 11 is one of the most structurally strong and robust devices. Its interior design is quite different from that of other models, which enhances the device’s efficiency, heat dissipation and other underlying processes. Especially the speakers, because the chassis has a rear cavity that allows air to resonate and facilitate the stereo speakers. The manufacturer claims that this enables the device to produce better low-frequency sounds. Xiaomi Mi 11 has a dual speaker setup, designed by Harman Kardon.
Image Courtesy: Gizchina
Why does the Xiaomi Mi 11 make strange noise while playing music?
However, if external pressure is applied to this cavity, it will result in a strange voice. The pressure changes the volume of the cavity where air resides, and hence, the properties of the sounds produced by the cavity also change. Xiaomi claims that any strange noise would disappear after a few seconds. The company also recommends the user to put excessive force on the device’s chassis, which might damage the audio experience.
Xiaomi’s Mi 11 has a 108MP primary camera, a 120Hz, Quad HD+ AMOLED display which shines up to 1500 nits. It ships with MIUI 12 out of the box, which is based on Android 11. A 4600mAh battery would last you throughout a day of moderate usage. Nevertheless, the device has not been launched globally and is only available in the Chinese market yet. Xiaomi also launched a bunch of accessories to go with their smartphones.
Xiaomi is one of the largest smartphone manufacturers in the world, just after Samsung and Apple. It is a leading smartphone maker in India and a few other markets. It offers phones in every price segment, be it from “very affordable” to “ultra flagship” with its custom skin MIUI. However, one thing that Xiaomi users won’t be able to escape is ads on MIUI, and unfortunately, there’s no paid version available too (chuckles). Anyway, now that the majority of the Xiaomi user base is fed up with the system ads, they have come up with various ways to remove them. Some of these methods remove ads partially, while some of them remove ads almost completely. It is unlikely that you will get rid of all the ads on MIUI as per common belief.
We at AndroidFist have curated a list of all the methods you can deploy on how to disable ads from MIUI on Xiaomi devices on various fronts. Be it browser-level or system-level ads, all will go down after you have followed these methods.
1. Revoke MSA Authorization
MSA or MIUI System Ads are the proprietary building block on ads shown all Xiaomi/Redmi/Mi smartphones that are sewed deep into the devices to show ads. It is a system app, and thus, you won’t find it on the home screen and neither on the app drawer. You can locate it in the Apps section, but it cannot be disabled. Luckily, you can revoke its authorization on your Xiaomi devices that will likely stop MIUI system ads on browsers, security, and other bloatware. Here’s how you can do it.
Firstly, go to the Settings >> Passwords and Security.
Navigate to “Authorization and Revocation”.
Scroll to the bottom of the page to locate a system app called “msa”.
Toggle it to revoke its authorization from running on your device.
Note: Apparently, MIUI will prevent you from revoking MSA’s authorization on the system. If that happens, simply try to revoke its access several times and this should work in your favor.
Once you have disabled the authorization on MSA, this will prevent this system app from pushing ads on various system apps like Mi Browser among others.
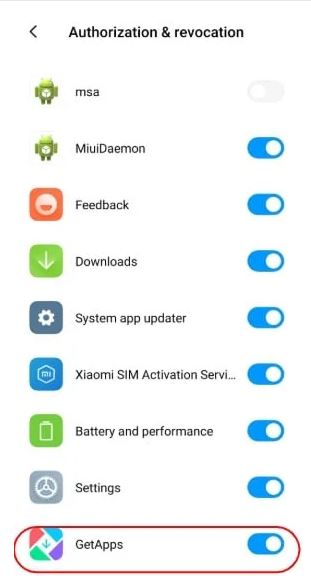
2. Revoke GetApps Authorization
GetApps is an MIUI App Store from Xiaomi and it is the place where you will get all apps and more. But technically, it is a bit annoying as it can also display a tonne of system ads on your Xiaomi smartphone and thus, must be dealt with. Here’s how you can revoke its authorization.
First, launch the Settings app on your device and proceed with “Passwords and Security”.
Click on “Authorization & Revocation”.
Find “GetApps” from the list and toggle it off.
Note: If you are unable to toggle it off on the first try, attempt to disable it multiple times and it would disable itself. Even if you revoke its authorization, it will still continue to function as it is as you will be able to use it freely. The difference will be, it won’t have authorization/permission to show system ads.
3. Stop Targeted and Personalized Ads
Apparently, Xiaomi has many ways to showcase ads on its Mi and Redmi devices. Even if a user turns down one of its services, others are active and can show ads. But hey, let’s not give MIUI any chance to show irritating ads whatsoever. Here’s how you can stop targeted and personalized ads on Xiaomi devices.
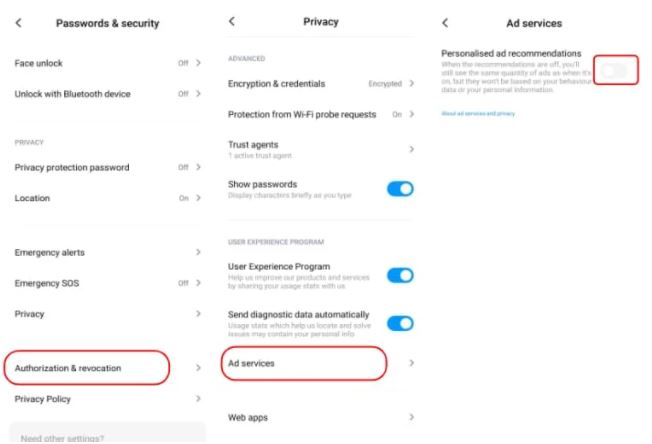
Firstly, launch the Settings app on your device.
Second, you need to navigate to the Passwords & Security section and then, proceed to the “Privacy” section and then, scroll down to the “User Experience Programme” section.
Now, you have to turn off the switch against “User Experience Programme” and “Send diagnostic data automatically”.
Tap on “Ad Service”.
Finally, toggle and turn off “Personalized as recommendations”.
Now that you have disabled targeted and personalized ads, it is quite assuring that whatever ads you get aren’t targeted especially to you. For those who don’t know much about personalized ads, these ads devour the personal information stored on the device including the user’s search history, behavior, and others and thus, breaching one’s privacy. Note that this aforementioned method works on MIUI 11 and previous iterations.
The MIUI 12 gives you a different option to kill all types of system ads that MIUI showcases on Redmi and Mi devices using just a single tap. Here’s how it works.
Firstly, launch the Settings app on your Xiaomi smartphone.
Next up, go to the Account option and then, tap on “Privacy Policy”.
Now, you will see the option “System Ads” within the Privacy Policy section.
Toggle it OFF to disable ads on MIUI 12 totally ( or at least most of them).
4. How to Disable Ads from Mi Video
As said above, Xiaomi has more than one way to showcase ads on Mi and Redmi smartphones. Mi Video is bloatware and thus, a system app that cannot be removed using the usual “uninstallation” method. Here’s how to disable ads from Mi Video on Xiaomi devices.
Firstly, you need to open the Mi Video app on your device.
Next up, go to the “Profile” tab located on the bottom right corner of the screen and tap on “Settings”.
Now, you need to turn off/disable “Online Recommendations”, “Personalised Recommendations”, “Push Notifications”.
Hope this will stop ads originating from the Mi Video app to a great extent.
5. How to Disable Ads from Mi Music
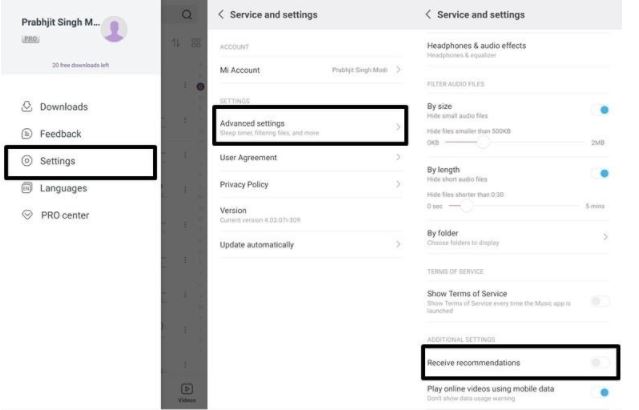
Apparently, Mi Music pushes its ads too although it might not be too much, but enough to enrage users. Here’s how you can disable ads from Mi Music using simple step-by-step instructions.
Firstly, open the Mi Music app on your Xiaomi device.
Next up, tap on the three horizontal lines or it is commonly known as the hamburger menu located on the top-left corner of the display.
Next up, tap on Settings and proceed to Advanced Settings.
Now, scroll down to the bottom of the screen to find “Receive Recommendations” so disable it.
That’s all. You have successfully disabled ads originating from the Mi Music app on your device.
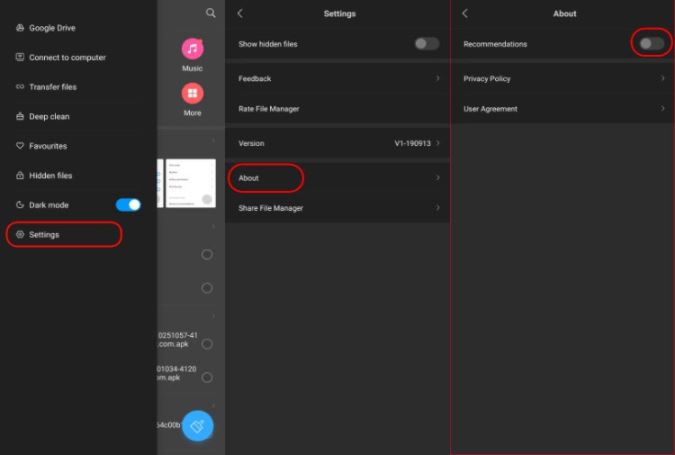
6. How to Disable Ads from File Manager
File Manager is an essential and integral part of any smartphone. It is where you will find access to all the files including system files if you have root access. It allows sharing files, managing them, and more. But when it comes to MIUI on Xiaomi devices, it shows ads here too.
Next, now you need to disable ads from Xiaomi’s File Manager that you will find across all Mi and Redmi smartphones. Here’s how you can do it.
Firstly, open the Mi File Manager app on your device.
Next up, tap on the Settings app and proceed to the “About” section.
Next up, you need to turn on “Recommendations” and this will potentially prevent the app from showing ads which it has termed as ‘recommendations’
7. How to Disable Ads from Downloads
There’s more. You will see a tonne of recommended and promotional content in the Downloads folder as well and that is annoying. Here’s a simple way to get rid of it.
Firstly, go to the Downloads app.
Tap on Settings.
Toggle off the switch against “Show Recommended Content”.
That’s pretty much how you can get rid of ads in the Downloads folder.
8. How to Disable Ads from Mi Browser
Mi Browser is available on MIUI although you might not get it on the latest MIUI 12. If you are using MIUI 11 and previous versions, here’s how you can get rid of recommendations on Mi Browser that would give you a breath of relief.
First up, go to the Settings app on your device.
Next, go to Settings >> System app settings >> Browser.
Proceed to Privacy & Security and locate “Personalized Services”.
Finally, tap on “Off”.
There you go, you have successfully removed ads from Mi Browser for good. This should prevent it from showing ads on Mi Browser whatsoever.
If you are using Mi Browser, you must be aware of the promotional content that Mi Browser might put up on the homepage. The easiest way to get rid of this promotional content is by disabling it using these easy steps.
Launch the Mi Browser app and proceed to the Settings.
Next, tap on “System app settings >> Browser Advanced >> Set start page”.
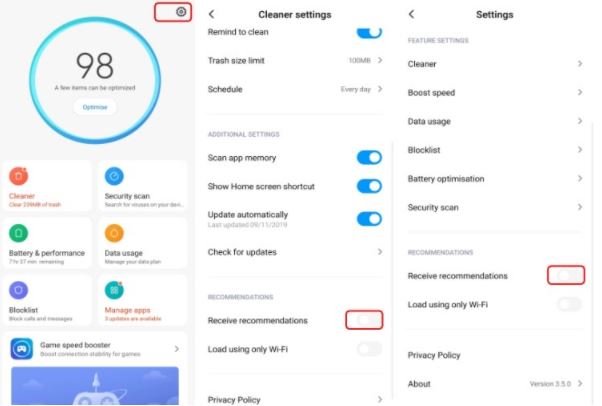
When you download apps from Google Play Store, Mi Security checks out for any security issues. There are many other features embedded with the Mi Security app including Cleaner, Updates, Boost Speed, etc. It offers features across Security, Data Usage, Blocklist, Battery & Performance, and other categories. But it has recommendations too that you gauge as ads or promotional content. Thus, removing them is the way to go. Here’s how you can do it about.
Firstly, open the Mi Security app on your device.
Next up, tap on the cogwheel icon on the top-left corner to navigate to the ‘Settings’ section.
Scroll to the “Recommendations” section to turn off or toggle off “Receive Recommendations”.
Next up, click on the “Cleaner” option on the same page and turn off “Receive Recommendations”.
Finally, click on “Boost Speed” and turn off “Receive Recommendations” from here too.
Image via Cashify
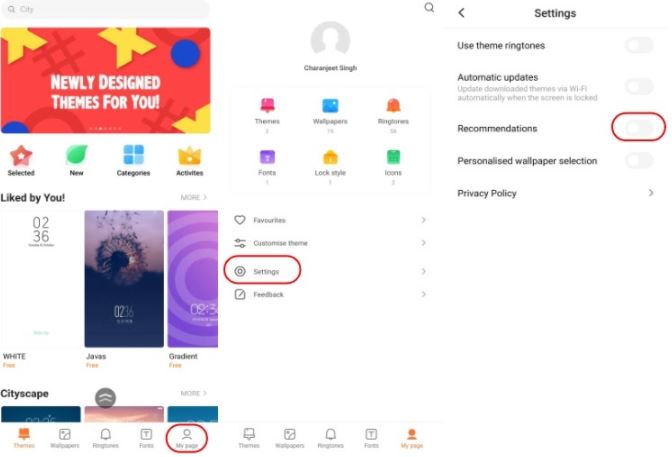
10. How to Disable Ads from Themes
Xiaomi devices have a separate app for themes and it is aptly named as “Themes”. It is where you get wallpapers, fonts, themes, and more options to customize your Xiaomi smartphone. Apparently, it is also buggy at times and filled with loud colors and is unnecessarily crowded. The cherry on the cake is that it shows ads and that is something we are here to deal with. Here’s how you can disable ads from the Themes app.
Firstly, you need to tap and launch “Themes”.
Next up, you need to tap on “My Page”.
Go to Settings listed on the “My Page”.
Finally, tap and toggle off “Recommendations”.
This should prevent ads from originating or showing up on the Themes app on your MIUI-powered Redmi and Mi devices.
11. How to Disable Ads Promoted Apps on Xiaomi devices
You will find out that some of the folders on Xiaomi devices like More Apps and Games push out “Promoted Apps”. You will see the apps being promoted in the folder itself or in the notification panel. Here’s how to disable it.
For this to work, locate the folder pushing out ads and long-press on it.
Go to its Settings and look out for “Promoted Apps”.
Toggle it off and you are done.
12. How To Disable Spammy Notifications on MIUI
We have tried Redmi devices before and one thing that bugs all of its users is the unending charades of notifications. Apparently, you will get notifications from almost all apps including a tonne of bloatware recommending stuff that you wouldn’t be interested in. I have personally disabled recommendations from many apps and still get recommendations and notifications like crazy. Thus, disabling notifications from all these apps is a much better option.
Here, you need to launch the Settings app on your phone.
Proceed to the Notifications section where you will get a complete list of all the apps installed on your smartphone.
Tap on each listing and disable notifications either entirely or partially for everything that you don’t want to get notified for.
If you are using Instagram, disabling notifications on items like being notified when some new user arrives on Instagram or if someone comes ‘live’ and it will probably save your notification panel from clogging. Similarly, disabling notifications from all bloatware will save a lot of your time chugging each and every notification that you get on your device. The end result is a clog-free notification panel as well as improved smoothness of the interface as there are no spammy notifications clogging it up.
These were almost all the ways you can use to disable from MIUI on Xiaomi devices. You might see some ads here and there but using all these methods, you are in for a treat as most of the ads are already removed.
Parler, the “free speech” alternative to Twitter and Facebook, has grown significantly over the past year. But the recent raid by alleged far-right extremists on the U.S. Capitol led to takedown of the Parler app from Google Play Store. Because of the service’s lousy moderation policies, the network turned into a platform to carry out violence in the U.S. To avoid any public security threat and violence in the coming days, Google took the lead to remove the app from Playstore.
One day after the Google Play Store takedown, Apple has also removed Parler from its app store, citing instances of people using it to carry out plans to raid Washington DC on January 20. In the recent Capitol raid, at least five people were left dead. Before taking it down, Apple had warned Parler to overhaul its moderation policies or get removed from the App Store. What this means is that the app is now not available on any of the said app stores. However, users who already have the app installed on their phones will continue to use it, or now maybe not!
After Google and Apple, Amazon to Suspend Parler’s AWS Hosting
After the Parler app removal from the Google Play Store and Apple App Store, Amazon has reportedly sent an email to the company regarding its violation of AWS terms. The hosting provider of Parler — Amazon AWS — has said in an email sent to Parler that it’ll shut off its AWS hosting for their social network. This means that Parler will now entirely stop working if the company doesn’t migrate their service to a new server.
According to an email acquired by BuzzFeed News, Amazon Web Services (AWS) will suspend Parler’s web hosting effective on Sunday. The hosting provider has given a 24-hour notice to the social network that it’ll suspend its service to the company. Though Amazon hasn’t announced it officially, but the reported email says that the company will shut down Parler’s account effective Sunday, January 10, at 11:59 PM PST. However, the company has assured that it’ll preserve all its data to let them migrate it on their own servers.
Earlier this week Samsung officially confirmed that its “Galaxy Unpacked” event will be held on January 14. In this event, the company is expected to launch the much-awaited Galaxy S21 series. But now, it looks like the South Korean tech giant will launch the unannounced Galaxy Buds Pro and Galaxy SmartTags at the event as well.
According to a recent post shared by Evan Blass, a leaked marketing render of a promotion shows either the Galaxy Buds Pro or SmartTags will come alongside the Galaxy S21 Ultra pre-order.
Galaxy Buds Pro and Galaxy SmartTags
Image courtesy: Evan Blass
A lot of reports have hit the web talking about the upcoming Galaxy Buds Pro and Galaxy SmartTags recently, and we have a lot of information about both of them already. So it’s widely expected that we can see both of these truly wireless earbuds on January 14. Previous leaks show the Galaxy Buds Pro will come in three color options — black, violent, and silver. Reportedly, they will feature active noise cancellation and a beefier 500mAh battery.
On the other hand, Galaxy SmartTag is a Tile-like tracker that uses Bluetooth to connect with nearby devices. It will let Galaxy owners find their misplaced devices. Powered by a replaceable button cell battery, the device relieves the user of its regular charging. According to the leaks, SmartTag is a small square device with rounded corners and a hole at one edge for a keychain or something like that.
Image courtesy: Evan Blass
The new pre-order poster indicates the Galaxy Buds Pro may expectedly arrive as a pre-order gift with the (presumably more expensive) Galaxy S21 Ultra model. The pre-orders for the other two models in the Galaxy S21 lineup — the Galaxy S21 and S21 Plus — may come with the Galaxy Buds Live instead. Since there’s less than a week left for the Samsung event, we should get to see these devices soon.
Last year, Samsung Galaxy Note 20 Ultra became one of the best flagship phones launched. It packs some of the great hardware and software combinations making the device a gem to use. As some of the features are restricted for development use, rooting is the solution one thinks of to experience it. So, today, I’ll be guiding you on how to root your Samsung Galaxy Note 20 Ultra using Magisk software.
What is Rooting
Rooting an Android device is like what jailbreak is to iOS devices. It is a process granting the users to gain complete control over their Android devices unofficially, allowing them to flash custom ROMs, manage bloatware and default applications installed, customizing the device with various animations and themes, installing MODs, and many more.
Advantages of Rooting
Extensive support to customizations.
Full manual control over the kernel coding.
Grants full access to manage applications, software, and bloatware.
Ability to install custom ROMs, OS in BETA, or stable version.
Disadvantages of Rooting
The device warranty gets void.
Malware and hacking problems are more prone to rooted devices.
The device may become useless if any step during the rooting procedure goes wrong.
Once the device is rooted, it becomes officially unsupported by the brands irrespective of the warranty is present or has expired.
Once enabled, switch off your device. Press and hold both the Volume buttons and connect your phone to your computer using a data syncing cable (no charge only cable to be used).
A warning screen will flash after which, release the Volume buttons and wait.
Press the Volume Up button once to boot your phone into Download mode.
Once booted into Download mode, long-press the Volume Up to enable the Bootloader on the Samsung Galaxy Note 20 Ultra, which will now proceed further in the wiping data stage.
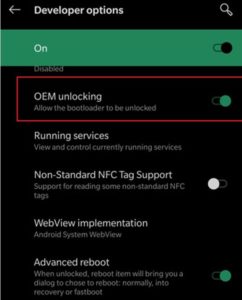
Once the step above gets completed, reboot your device and check for the status of OEM Unlocking in the Developer options menu and check whether it has been greyed out or not. If yes, then the bootloader of your Samsung Galaxy Note 20 Ultra was successful. If not, then try again with the steps carefully this time.
C. Rooting Samsung Galaxy Note 20 Ultra Using Magisk Tool
Extract the firmware on your computer, and search for an AP file in the extracted folder. It’s a file named with AP in the beginning in the tar format.
Extract the Odin Flash Tool zip file on your computer.
Copy it to your phone’s internal storage.
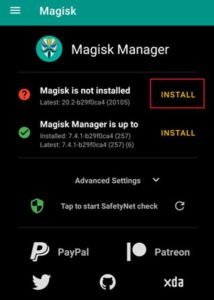
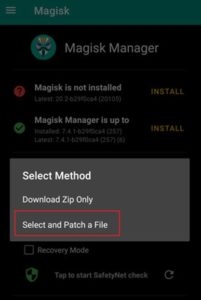
Open the Magisk Manager application on your device and click on Install>Install.
As the installation progresses, a pop-up shows up, asking for the method selection. Here, select the Select and Patch a File tab. Browse the path and select the AP tar file that you earlier copied into your device.
The patching process will now begin.
When the patching process finishes, go to the Download folder of your phone, where, you’ll find a file named magisk_patched.tar.
Copy that file from the Download folder to your computer and extract it.
When done, you will find the boot.img file in the extracted folder. Copy it to your phone and perform the same patching steps as you did for that AP file.
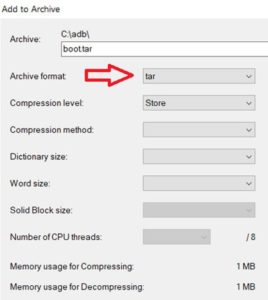
Copy the (magisk_patched.img) to your computer and rename it to boot.img. Archive the above file in the tar format.
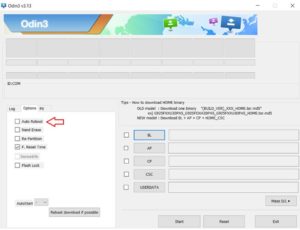
Open the Odin Flash Tool on your PC and untick the Auto-Reboot options.
Now, click on the AP button on the right-hand side and load the magisk_patched.tar (This is the file that you manually compressed earlier) file.
In the USERDATA section, load the boot.img file that you patched in the earlier steps.
Boot your Samsung Galaxy Note 20 Ultra into Download Mode. Now, connect it to your computer. Odin Flash Tool will automatically detect your device and blue color will display in the first stack.
Click start. This will begin the process of flashing the patched Magisk file to your phone.
A completion message will show up after which you can disconnect your device.
Boot your device into Stock Recovery mode.
Select the Wipe Data/Factory Reset option for final cleaning.
Reboot yourphone into the system mode and install the Magisk Manager. Open the application and check the status, which will indicate that your Samsung Galaxy Note 20 Ultra is now rooted.
Conclusion
Congratulations, your Samsung Galaxy Note 20 Ultra is now officially rooted. Go ahead and try out various custom themes and ROMs, animations, apps to experience the magic of root. Lastly, dropdown your views, comments, or any feedback for further assistance, and we shall see you in the next one.