
Your Google Pixel 5 comes with pre-installed software from Google. Although the Android operating system is pretty much open compared to Apple iOS, it is still restricted in some or other ways. This is to prevent users from modifying it more than it should prevent risking opening a backdoor for intruders, threats, and unwanted elements to feed on your system. There’s a multi-step method that you can employ to unlock the bootloader, root the Pixel, and install a valid Safetynet to get the best user experience without the hassle. Before you can dive into the detailed step-by-step instructions, you must clearly understand what is a bootloader, rooting, and Safetynet that we have discussed here.
What is Bootloader?
A Bootloader can be explained as a manager for partitions made up on your device’s storage. For example, system files are stored in a separate partition of a hard drive or storage while the app data is stored on others and the data that you access is somewhere else. Here, a bootloader is progress keeps a tab on a few things at startup including checking several places for any issues. It checks whether the software (operating system) is running and verifies it before the software loads itself.
The bootloader is locked by default as manufacturers don’t want users to modify or alter it as it may cause more harm if done wrong. Some manufacturers offer an unlocked bootloader so that the users can tinker with it a bit.
Unlocking a bootloader opens up great opportunities including loading a custom software or custom ROM and so on. The bootloader is also tasked with entering the recovery mode or running Android as and when instructed. Unlocking a bootloader allows you to root your device which has a plethora of benefits as we have mentioned in the next section.
What is Rooting?
Rooting or as iPhone lovers will call it jailbreaking, it’s the process of unlocking one’s device’s operating system. Here, the user uses a set of instructions to gain the privilege of an administrator or a superuser. It is something a non-rooted device will never allow.
Rooting Android smartphones like Google Pixel 5 allows you to grab the opportunities for customizations. You can tweak almost every aspect of the device, install tools, and mod that the system would otherwise deter from installing. Moreover, it brings along battery and performance improvements, deep automation, and extreme customization on-board. You can load custom ROMs on your device if outdated, with added features and more that. You can get more free space as all the bloatware that were earlier unavailable for uninstallation can now be uninstalled.
One of the many USPs of getting your phone rooted is the ability to download apps from any platform. Now, you don’t have to rely on Google Play Store but you can choose from hundreds of venues to download apps that Google has not assessed for user security.
But when it comes to advantages, there are disadvantages of performing rooting on your device as well. The most common is the phone transforming into a useless brick. One wrong step during the multi-layered rooting procedure and your hone will turn into an unusable piece of metal or plastic. Rooting your device also voids the warranty at the first go so you no longer have that battery exchange coverage or any other services under warranty on your device now.
One of the dead giveaways of rooting your phone is it becomes vulnerable to hacking and malware. Doing so allows intruders to steal sensitive data that can be used wrongfully.
What is SafetyNet?
There are millions of apps available on the Google Play Store. There are a plethora of reasons why developers choose Google Play Store as it is a solely authorized app store for Android devices unless you have a first-party store like Huawei’s App Gallery or Samsung’s Samsung Apps. When it comes to the developers, Google has many mechanisms in place. SafetyNet is one of them and it has many APIs and services that are focused on keeping the apps and the app store secure. It regularly checks for obsolete apps and removes it from the Google Play Store.
SafetyNet from Google allows app developers to have a secure application. It protects sensitive data from leaking out while protecting the integrity of the device as well. Google performs hardware-based attestation with SafetyNet to assess if the app works as deemed on Android devices.
There are many underlying reasons behind getting a valid SafetyNet on a smartphone including the services to build secure apps that won’t run on tampered devices. SafetyNet has many attestation levels of security that prevent users from malicious URLs, tampered gadgets, fake users, and so on.
Now let’s see how you can actually perform the said process – Unlock Bootloader of your Pixel 5, root it with Magisk, and install a valid SafetyNet.
Note: We wouldn’t stress this enough but whatever you perform after this cautionary message is your responsibility. Unlocking the bootloader and getting it rooted sounds fun but do it wrong or make a goof up and risk bricking your phone.
How to Unlock Bootloader, Get Root and Install Valid SafetyNet?
This is a tutorial on how to unlock the bootloader on your device, get it rooted, and install a valid Safetynet for your phone. We have bifurcated it into four parts with step-by-step instructions on how to do it.
Part One: Getting Ready
Just make sure your phone’s battery is completely charged up to prevent any issues further. Since proceeding further will wipe out all the data, it is advisable to take a backup of the data before stepping ahead.
Enable Developer Mode

You need to enable Developer Mode on your device, and here’s how you can do it.
- Open the ‘Settings‘ app on your phone.
- Proceed to ‘About the Phone‘ or ‘About Phone‘.
- Locate ‘Build Number‘ and tap it 7 times. You will see a notification saying “You are a Developer now”.
Enable OEM-Unlocking

You need to enable the OEM-Unlock or OEM-Unlocking in the Settings, and here’s how to do it.
- Firstly, launch the Settings app on your phone.
- Navigate to ‘System’.
- Tap on ‘Extended’ or ‘More’ (If prompted).
- Proceed to the ‘Developer options‘.
- Spot ‘OEM-Unlock‘ and enable it by toggling the option.
After completing Part One consisting of two settings options, you are now proceeding towards unlocking the bootloader. Note that this wipes off all the data from your device no matter what so proceed accordingly.
Reboot the Phone In Fastboot Mode
Toggling to the Fastboot Mode can be different depending upon which smartphone and OEM you are using. Generally, here’s how you can reboot the Fastboot Mode on Pixel devices.
- First up, turn off your phone by long-pressing the power button and click on ‘Turn Off’.
- Press the Power + Lower Volume Button together for a few seconds that should allow the phone to reboot in fastboot mode.
Part Two: Using Fastboot to Unlock Phone
This part revolves around using Fastboot on your phone and the PC after pairing. Here’s how you can do it but be cautious.
Note: Make sure you have the ADB and Fastboot files (Android SDK Platform Tools) on your PC before proceeding further. If you don’t have it, click here to download it for Windows, Mac, or Linux. Once you download it, extract the zip file on the path where you want it.
- Connect your Google Pixel 5 with your computer/PC using a USB cable that comes out-of-the-box.
- Next, Open the path on your computer where you extracted the ADB tools as aforementioned.
- Tap on the press Shift & Right-Click on the mouse and open Command Prompt. OR press Control + L and type “cmd” to open the Command Prompt.
- Type the code “fastboot devices” and it will display the serial number of the devices connected to the PC.
- If the results are empty, either you haven’t connected your Pixel 5 properly or there’s some issue. Remove the USB cable and connect it again.
- Also, you might have to wait sometime as the system updates the USB driver or takes time to recognize the device at first.
- In case if the USB driver or other drivers are outdated, you’ll have to update it to ensure an uninterrupted connection between the phone and the PC.
- If you can see the Serial Number after entering the first command, type “fastboot flashing unlock” on CMD. If there’s an error, use the code “./fastboot flashing unlock” (excluding the inverted colons)
- Check your phone for a message that says “not unlock your phone”. You need to use the Volume Up button to switch it to “unlock your phone”.
- Use the Power Button to accept the option. It is similar to that of Recovery Mode on Pixel devices.
- Your phone will reboot itself which takes a few minutes. Here, the system wipes out all the data on your phone transforming it into its factory version.
Part Three: Installing Boot Image with Magisk 21
Step 01: Patch The Stock Boot Image
The next step requires you to download the stock boot image depending upon what firmware your phone is using. This part revolves around patching it up using Magisk Manager and here’s how you can do it.
Method 01:
- You need to download the stock boot image for your Google Pixel 5. This image should carry the same software build number that your phone comes installed with.

- Next up, connect the phone to the PC using the USB cable.
- Transfer the downloaded boot image to the internal storage of your device.
- Disconnect the phone from the computer.
- Next up, you need to download the latest version of Magisk Manager via APK and install the same on your PC.
- The next step is to launch the Magisk Manager on your phone.

- Tap on ‘Install’ when prompted that ‘Magisk is not installed’, and confirmed by tapping on ‘Install’ on a pop-up menu.
- A pop-up menu asking users to ‘Select Method’ will appear on the screen. Tap on the ‘Select and Patch a file’ option.
- You need to find the boot image that you downloaded earlier and transferred to the internal storage. Select it.
- Magisk will take over the boot image and will patch it up.
The process could take a few minutes but the result will be a Magisk Patched Boot Image for Google Pixel 5. It will be stored in [internal storage]/Download.
OR
Method 02:
There are two types of boot images. The first is a KDDI version and another is a regular one. Based on what firmware your Pixel 5 (or any Pixel) is using, you either need to download the KDDI version or a regular one. Here’s a pre-patched boot image for Pixel 5 with Magisk 21 (build 21005).
Note: The second method listed here saves you from the trouble of getting the boot image patched. This will save your efforts as well. But if you are using Pixel 4 XL or below, you can use the first method to get the boot image patched as these links are for Pixel 5.
Step 02: Flash The Patched Boot Image To Root Pixel 5
You are almost done rooting your Google Pixel 5. This is the last step you need to perform to submit the process. Here, you need to flash the system with the Magisk Patched Boot Image using fastboot to root your Pixel 5.
Note that using Magisk to flash patched image installed it in a partition thereby not modifying the actual system files. This is also called a systemless root. Here’s how you can do it.
- You’ll need to copy the pre-patched “img-file” that you just downloaded or copy the Magisk patched version you obtained via Method 01 in the folder where you extracted the ADB files earlier.
- Press the Shift Key and Right-Click on your mouse on a space inside this folder.

- Select ‘Open PowerShell window here’ from the dropdown menu that will launch PowerShell.
- Turn off your Google Pixel 5.
- You’ll need to boot up your phone in Bootloader Mode.
- Use the Volume Down button, press & hold it along with the Power Button for a few seconds to launch Bootloader Mode.
- Now, connect the phone to the PC/computer via the USB cable.
- Copy and paste the following code in the PowerShell window that will allow you to gauge if the fastboot detects your phone.
Code: fastboot devices
- When you type the above code and hit enter, you must receive the Serial ID/Device ID. If not, check if the required USB drivers are properly installed and updated or not.
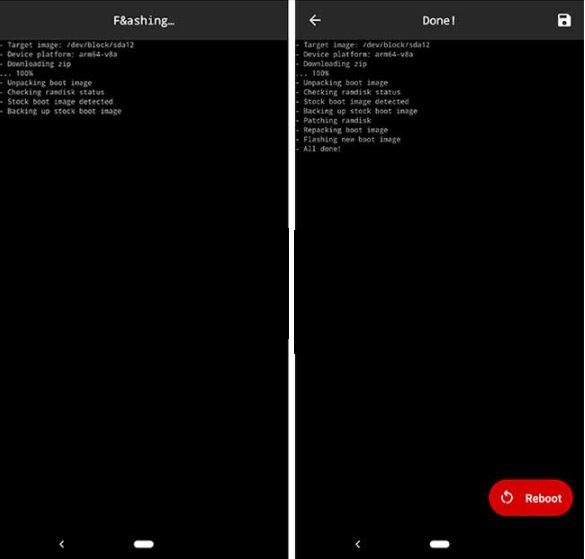
- The next step is to enter the command fastboot flash boot “magisk_patched Build 21005.img” ( if you used Method 01) or “fastboot flash boot magisk_patched.img” (if you used Method 02). Let it run and process.
- Finally, type ‘fastboot reboot’ on PowerShell to reboot the device, and there you have it.
- You need to verify if your Pixel 5 has been rooted or not. Launch the Magisk Manager app on your device by rebooting the device. If you can see a red button titled “Uninstall Magisk”, it means you have rooted the device.

You have successfully rooted your Pixel 5 by unlocking the bootloader and getting it to root via Magisk. You’d also need a valid SafetyNet that you can read more about it here.
Part Four: Install valid Safetynet on your phone
You need to install a valid Safetynet on your Pixel 5 to prevent any issues. Here’s how you can do it.
- Firstly, open the Magisk Manager on your device and tap on ‘Settings’ gear icon.

- Enable ‘MagiskHide’ under ‘Magisk’.
- Next, click on “Hide Magisk Manager” listed just above MagiskHide. Name it and click on “OK”. This will take a few seconds until it reopens.

- Tap on the Main Menu of the Magisk Manager app and tap on “Shield Icon” to open it.
- Proceed to the option “MagiskHide”.
- The next step is to select the item “Google Play Services”. When you unfold it, there are several sub-items that you need to toggle or enable. Enable all the hooks available under the Google Services menu.

- Proceed by tapping on “Go Back” direct to the Main Menu on the app.
- Next up, scroll to the bottom for the search icon where type the keyword “MagiskH”.
- Install the Module called “MagiskHide Props Config”. It may take some time.
- The next step is to reboot the Pixel 5 after the installation and it is over.
- The next process has two methods to do it.
- First: Install Terminal on your Pixel 5 via Google Play Store.
- Second: Enable USB Debugging mode in the “Settings >> System >> Developer Options”.
- Enter the code “su props” where ‘su’ is to allow root access and ‘props’ is for the MagiskHide Props software.
- The following commands set your Google Pixel 5 as a Google Pixel 3a (which is a giveaway) with BASIC key attestation.
- 2 + Enter
- F + Enter
- 7 + Enter
- 20 + Enter
- y + Enter
- y + Enter
- Finally, reboot and verify that you have successfully passed Google SafetyNet on your Google Pixel 5.
That concludes our detailed step-by-step guide on how to unlock the bootloader, get root, and valid Safetynet on Google Pixel 5.
Also Read: How to Install Gcam 8.0 mod in all Android smartphones


